

This week we are very lucky to have the fabulous input from homemade_learning mum Hilary who has a wealth of knowledge when it comes to engaging kids in learning and making it fun so that learning is always through play. You can follow all of her brilliant ideas on her Instagram or Facebook page.
We’ve decided to do a wee twist on activities this week by both doing the exact same activity – but one will be indoors using indoor resources and the other will be outdoors using as many natural resources as possible.
We want STEM to be as easy and as fun and as accessible to all as it possibly can be – and so thought this might be a great way to showcase how easy it is to tailor an activity to suit your needs or different age ranges of your children.
Please let us know if you have any questions or if there’s a concept you’d like to see us teach.
Activity 1
Symmetry
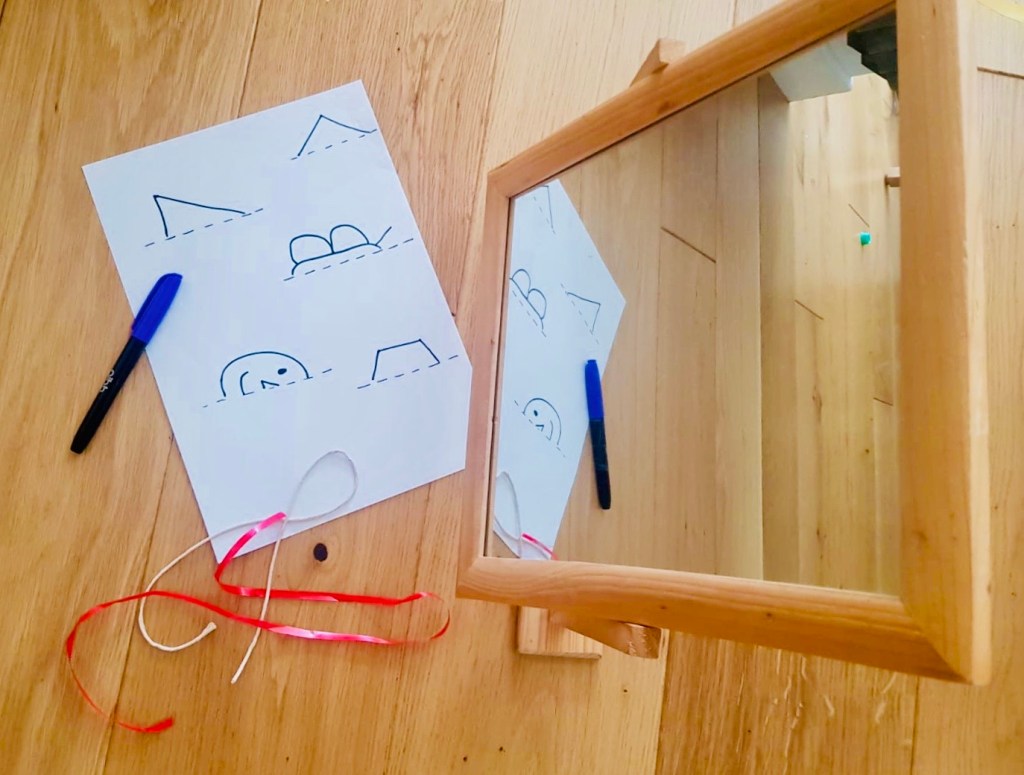
Indoors
You could use:
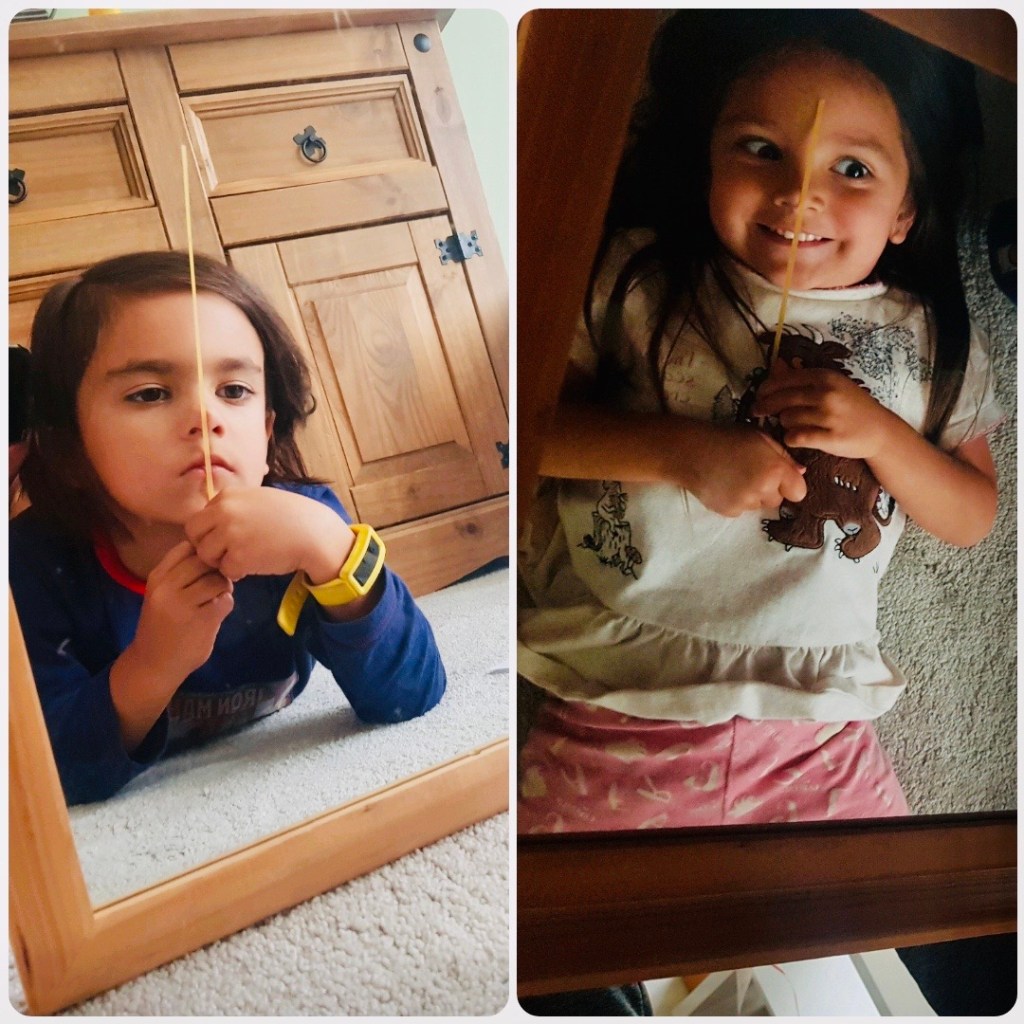
- Some ribbon or string (or in our case also some spaghetti!)
- Various household objects
- A sheet with various half pictures (optional)
- A mirror
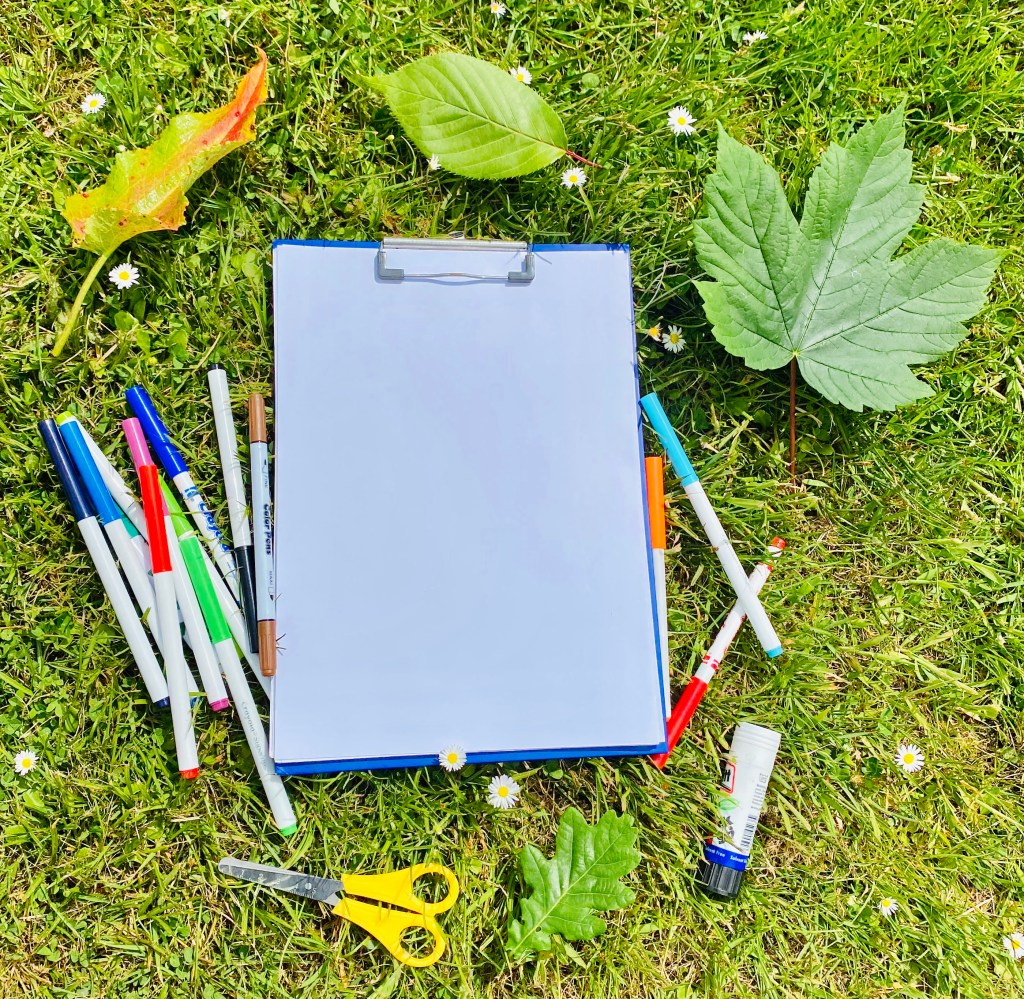
Outdoors
You could use:
- Leaf
- Paper
- Pens/pencils
- Scissors
- Glue
Exploring symmetry from a young age is great practise for more complicated images as children advance through the maths curriculum.
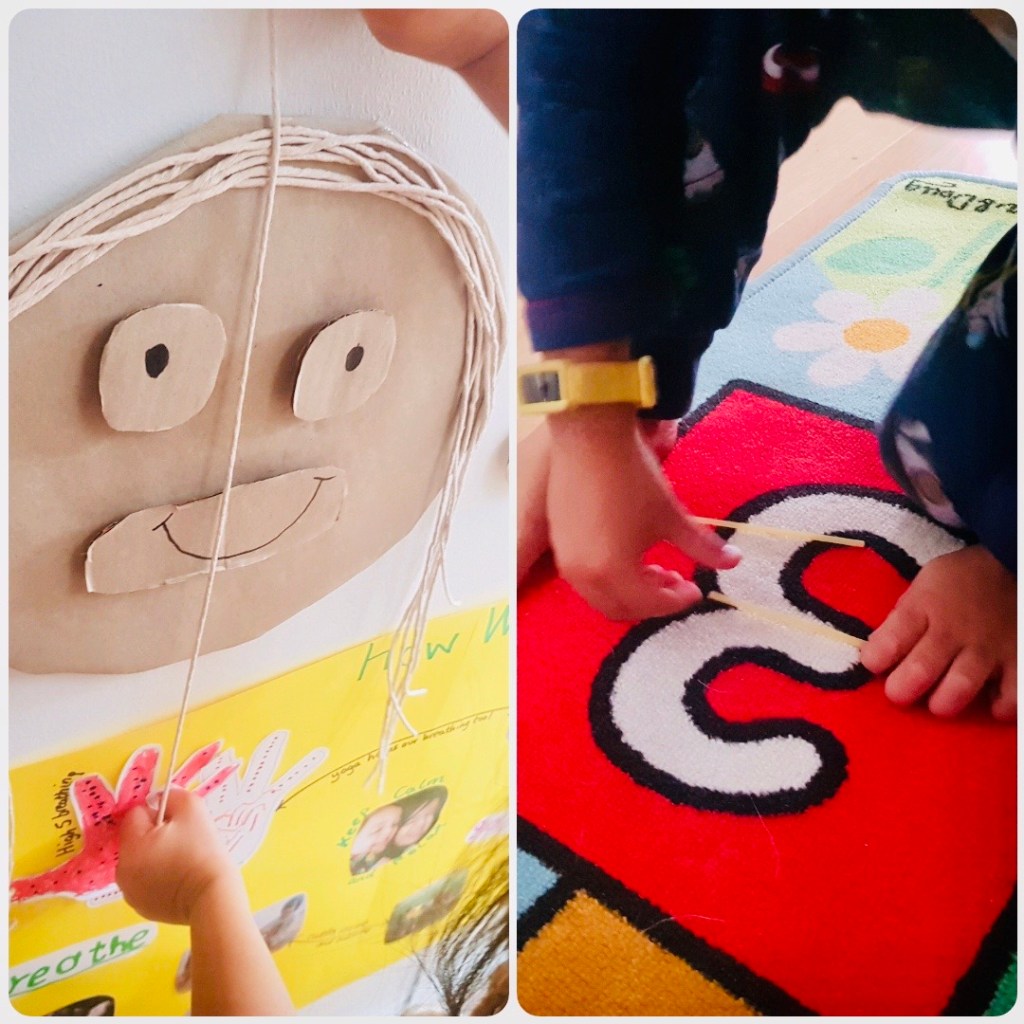
Indoors We looked in mirrors and at objects around the house to identify some lines of symmetry. We even noticed that some items had more than one line of symmetry,
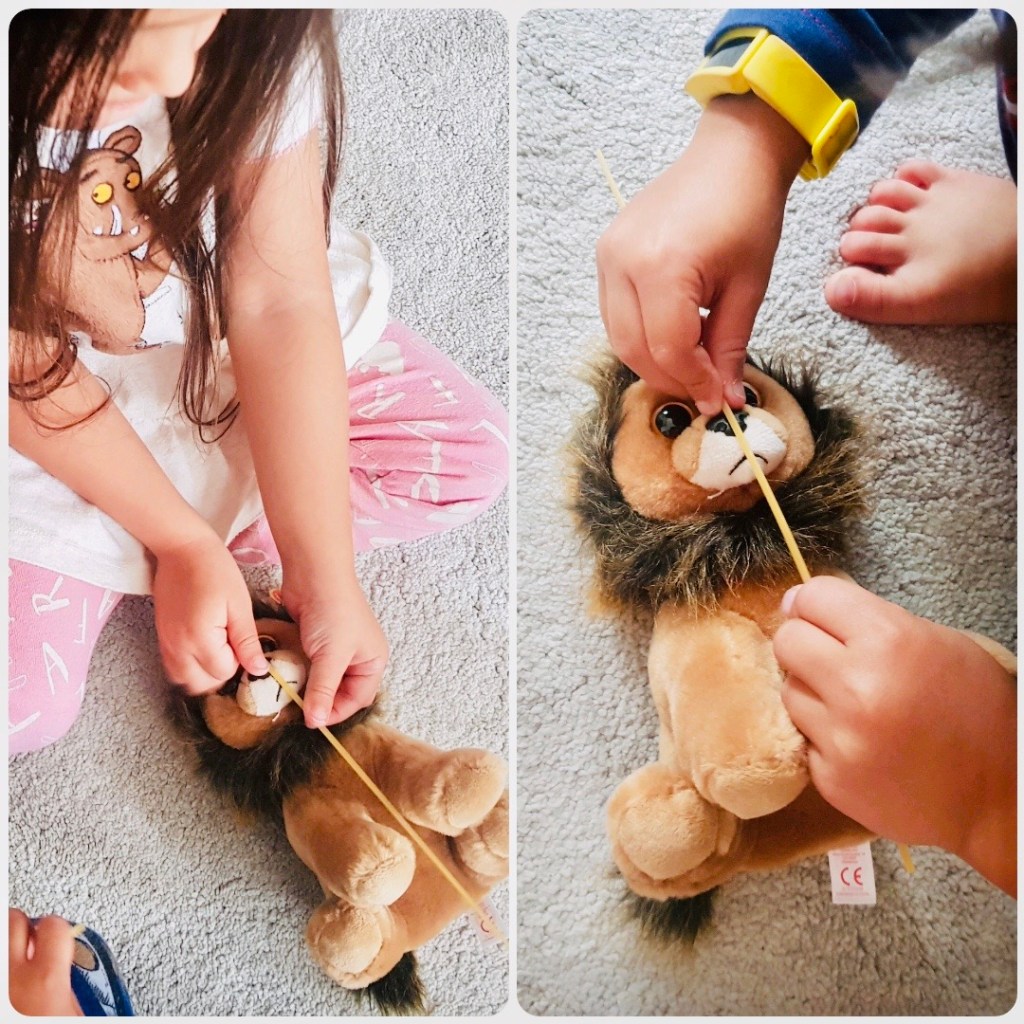
like a square and a circle “all the way round”. We tried using spaghetti, string and ribbons to find our mid lines. If we weren’t sure if an object was symmetrical we tried to imagine if it would fold perfectly, or used a mirror to help us. This was a great fun activity and Aidan and Anya explored together, totally child led, for nearly an hour.
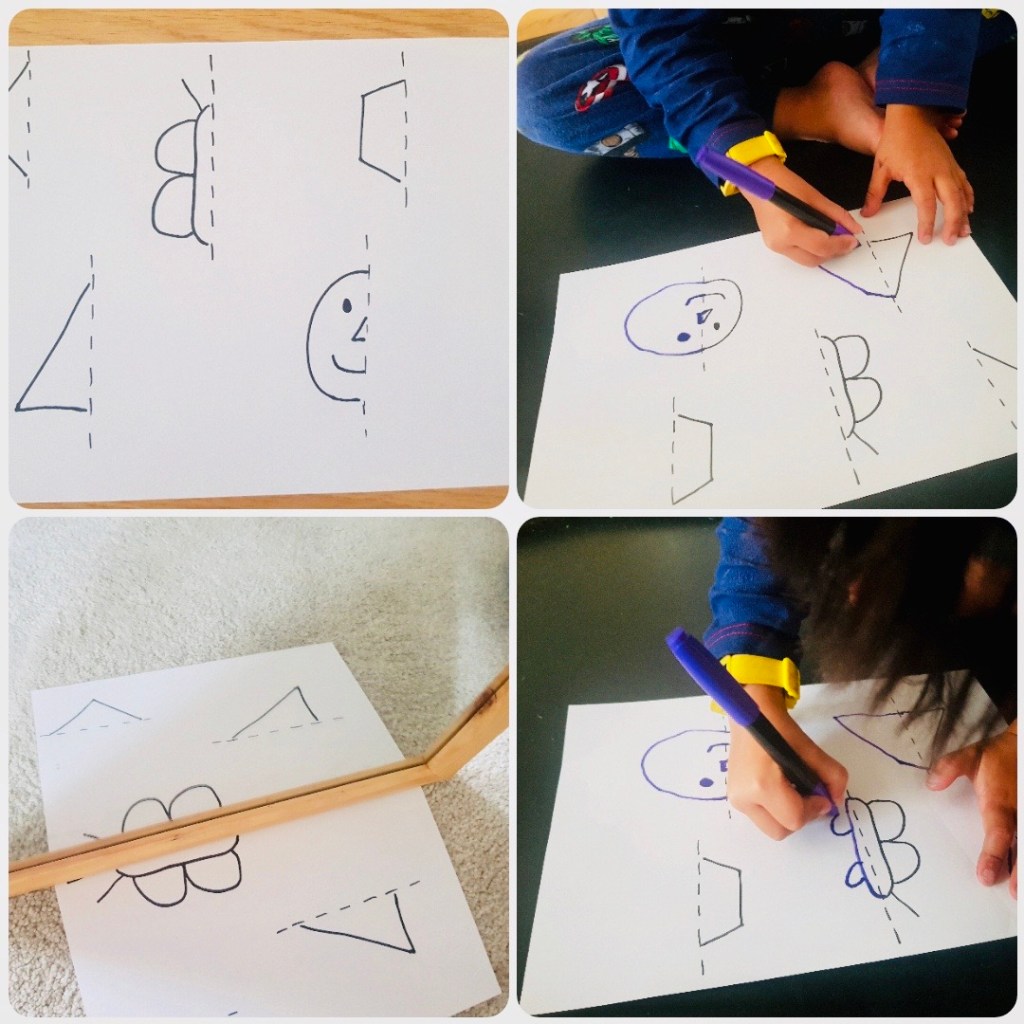
That’s always a winner in my eyes. Aidan also enjoyed the follow up sheet I made where he had to complete the other half of a drawing to make it symmetrical.
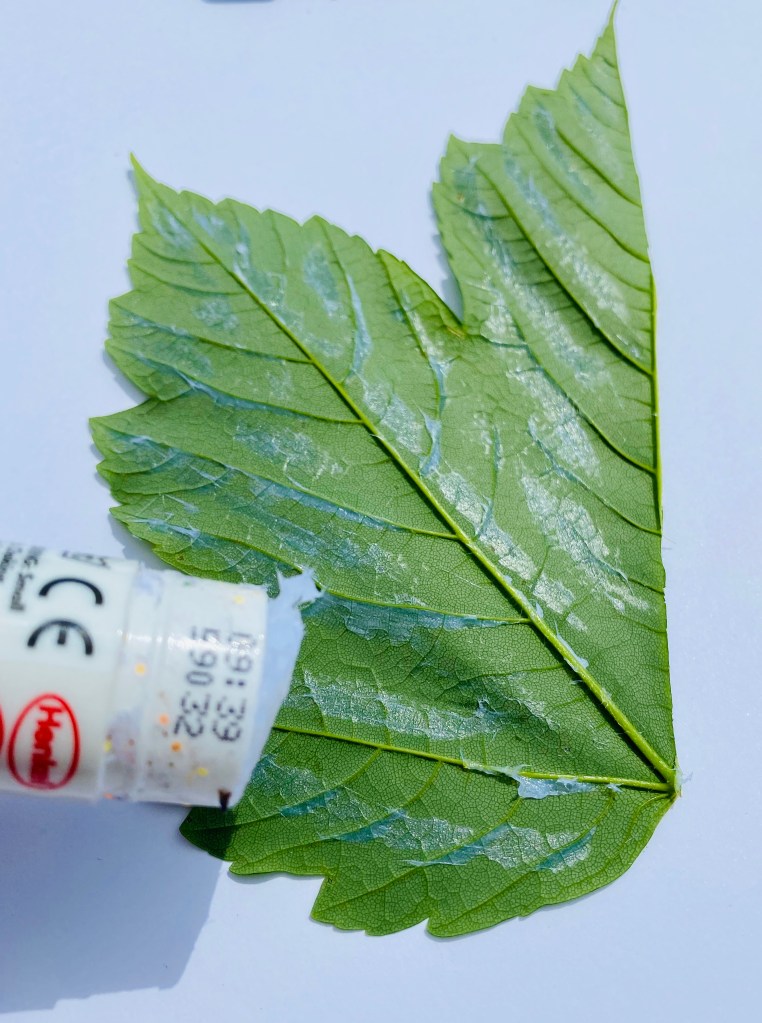
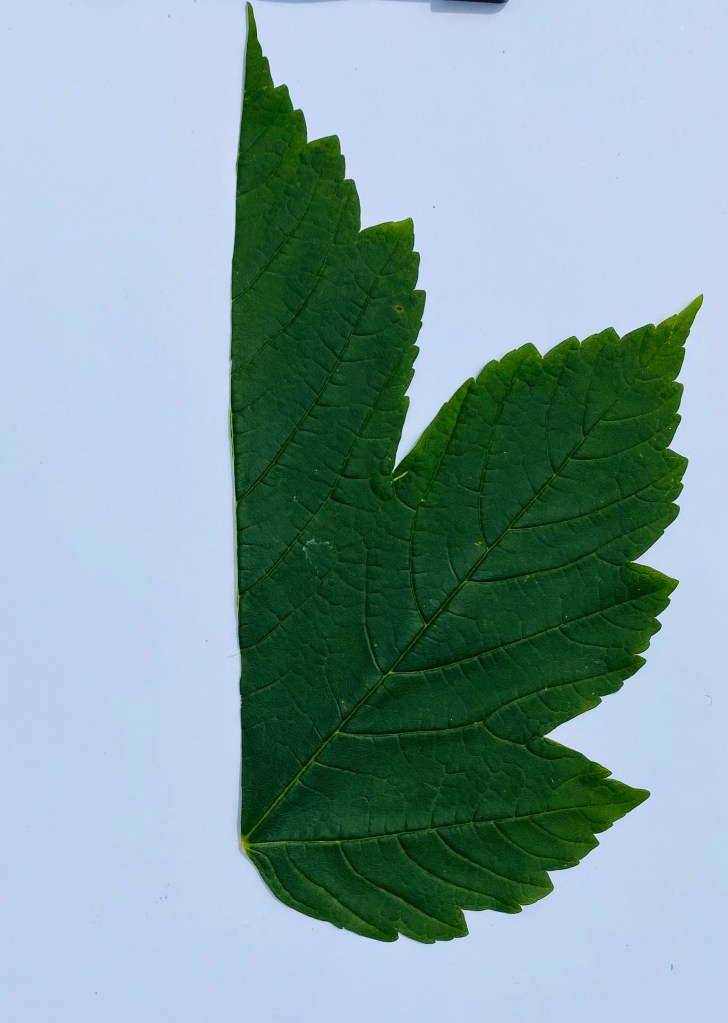
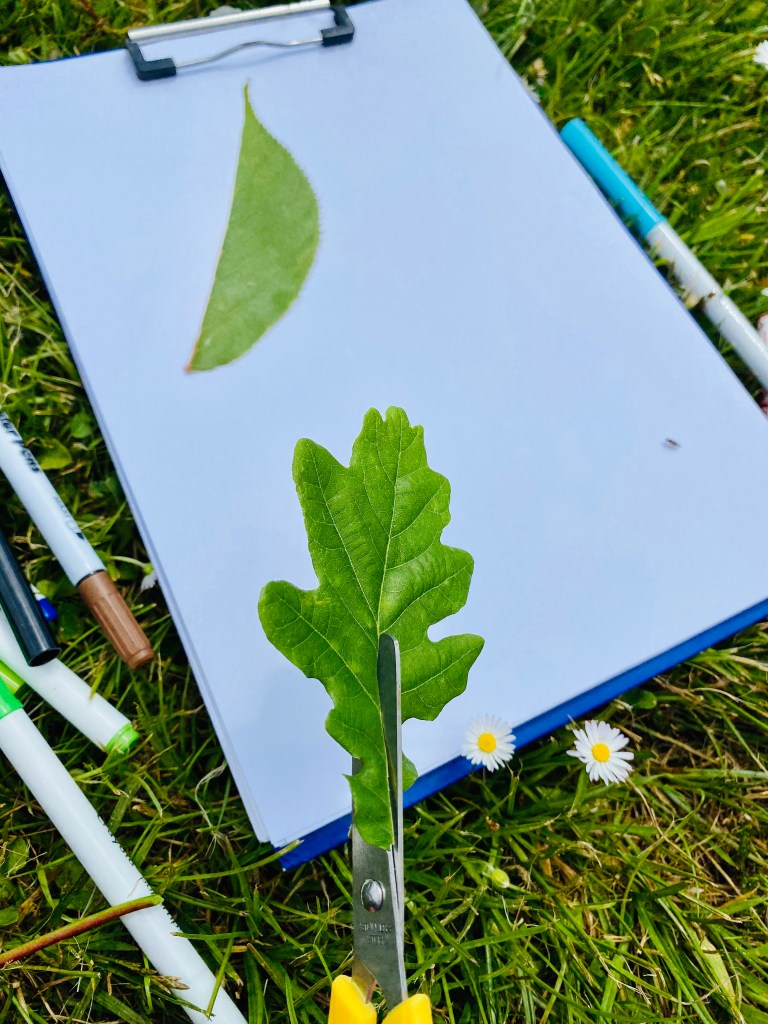
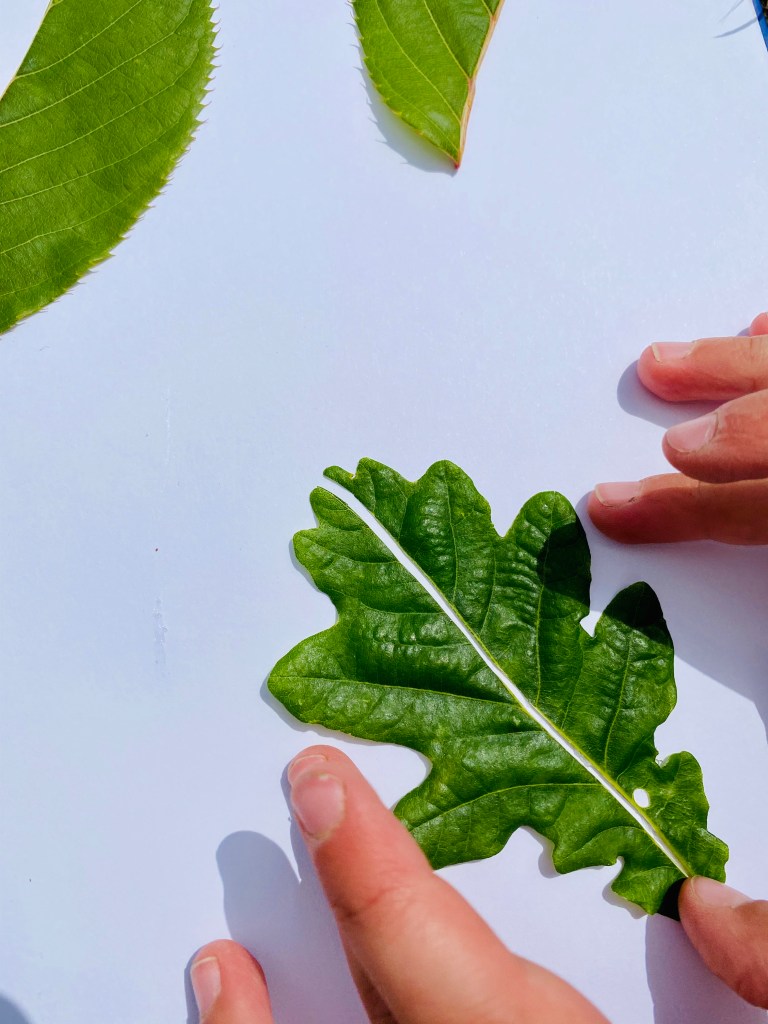
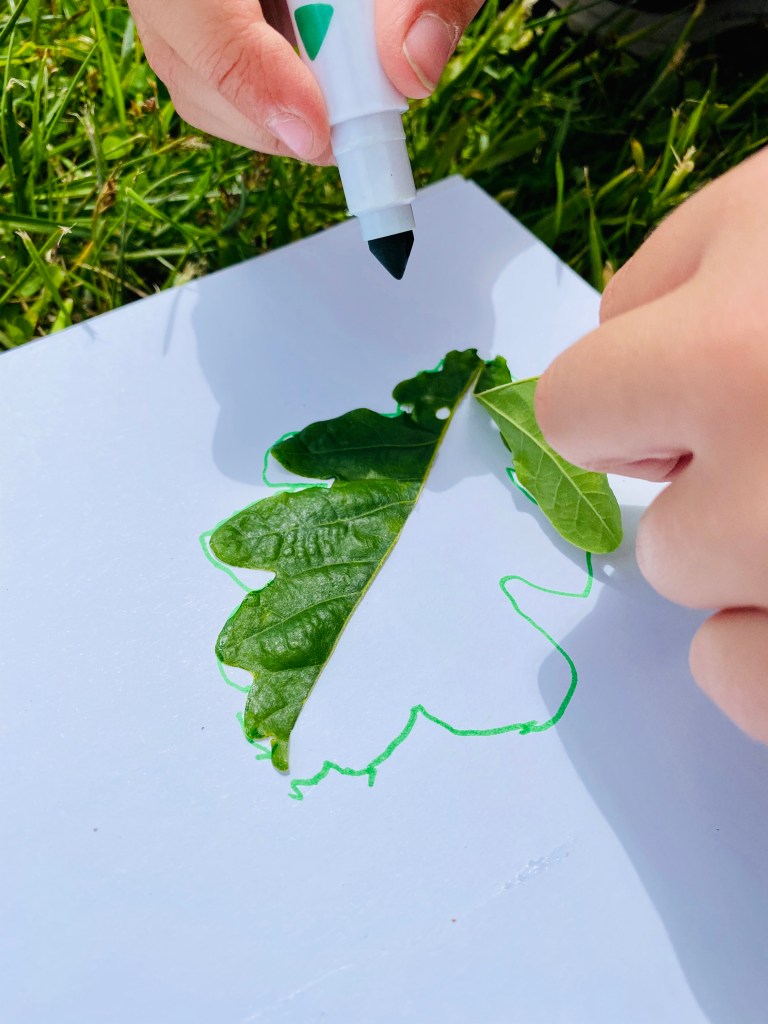
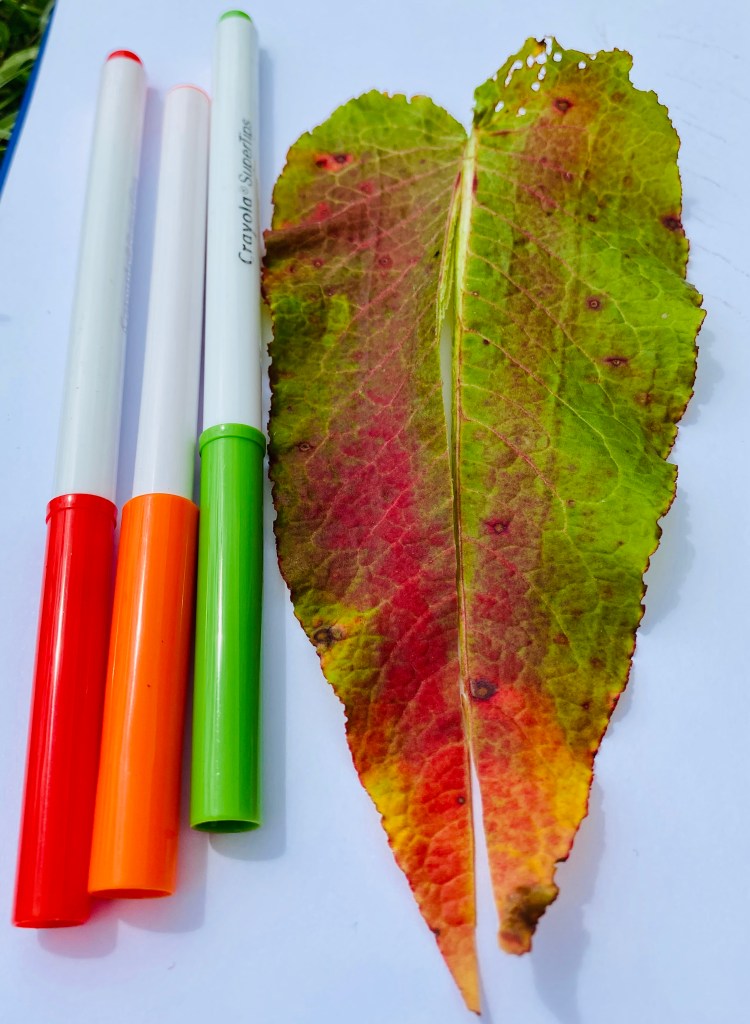
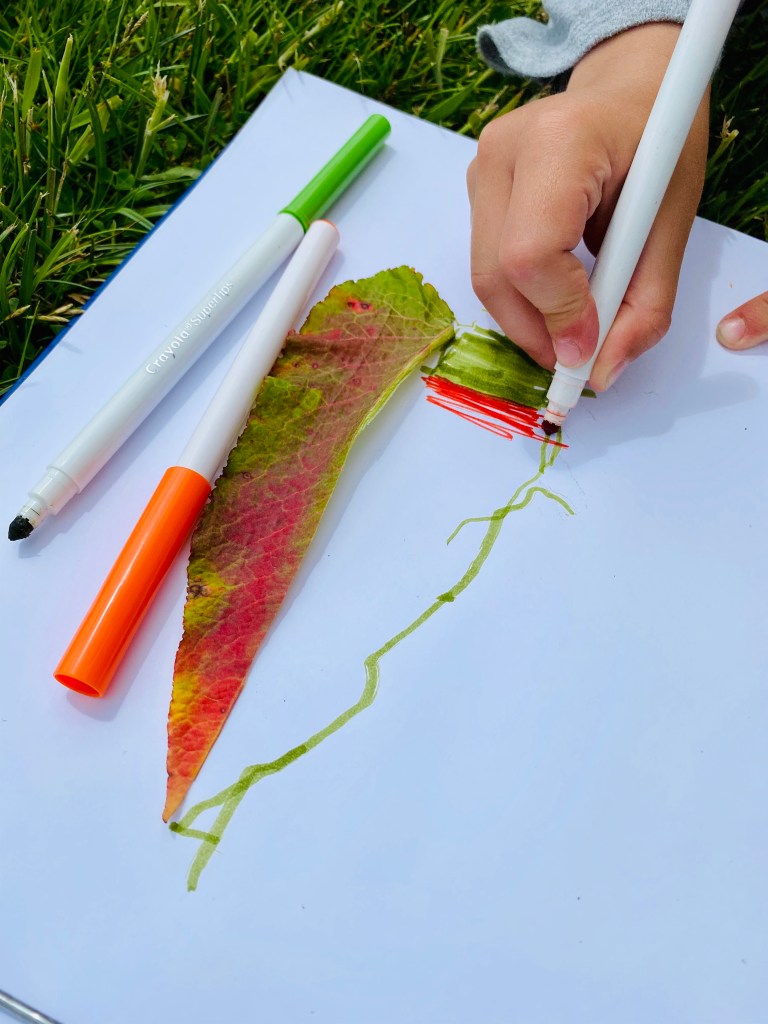
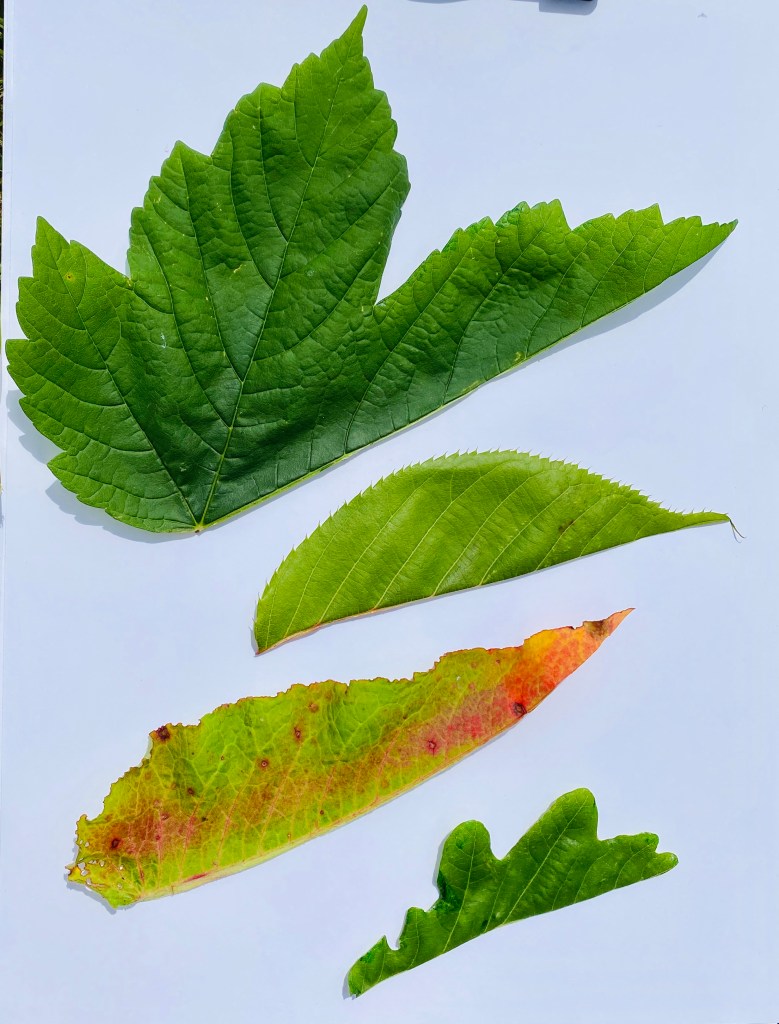
Outdoors we used leaves, cut them in half, glued them onto paper and then either used them as jigsaw pieces to match the other half (exploring early symmetry for younger learners), traced around the other half before filling in the details, or drew the other half and coloured it free-hand. We talked about angles and directions of leaf veins and tried to mirror them in the drawings. We tried to name the leaves and discuss the different outlines of each. We also touched on shading – and how pens are rubbish for this!

Activity 2
Shapes
Indoors
You could use:
- A kids camera/tablet camera
- PlayDoh
- String

Outdoors
You could use:
- Sticks
Children love finding shapes in everything they see – so we thought this might be a fun way to see the different ways shapes can be explored inside or out.
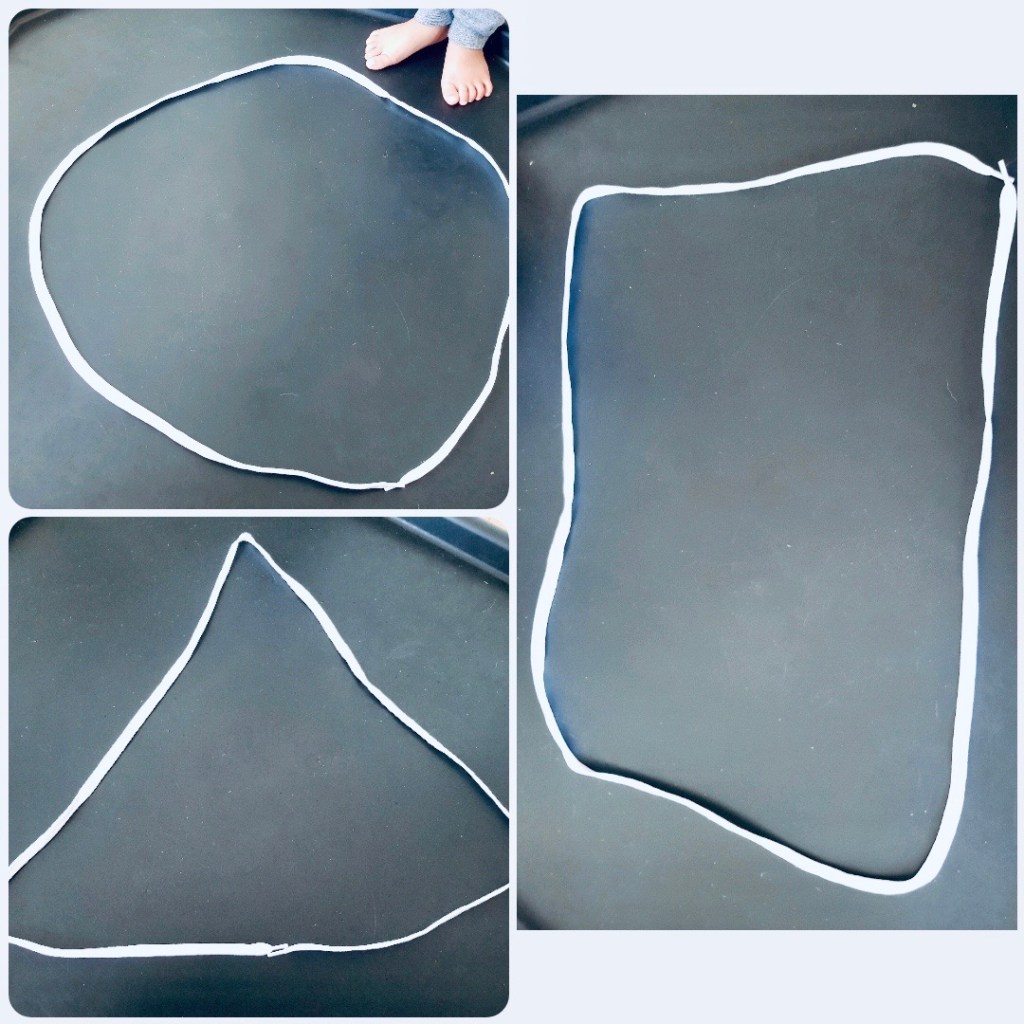
Indoors We started off by using our cameras to take pictures of objects that were a recognisable shape. We were amazed at the number of circles, squares and
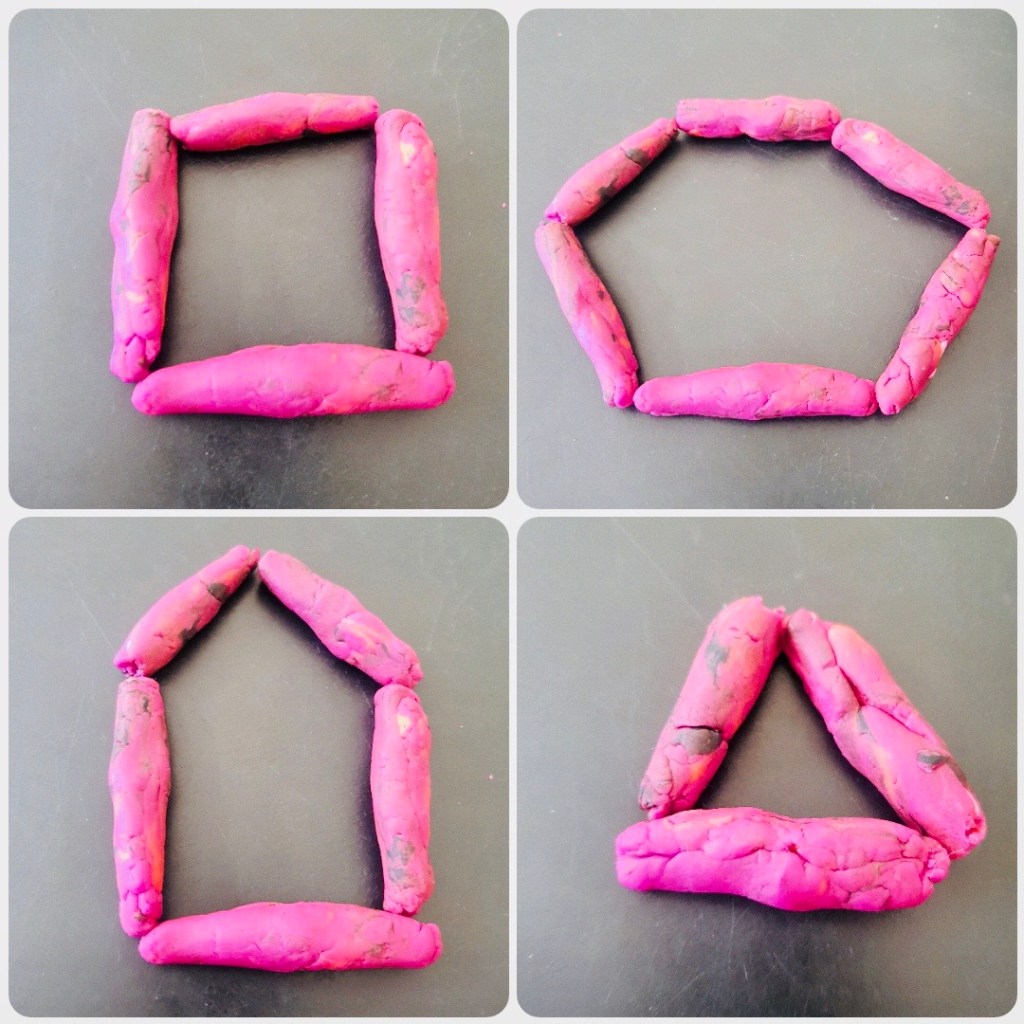
rectangles we spotted on toys, furniture, windows, in books! We used a long piece of string to form in to various shapes. Aidan commented that it was hard to make shapes with lots of sides. For this reason we used some playdoh and made lots of sausage shapes. We then used them to make shapes with lots of different numbers of sides. When discussing that ‘oct’ meant 8 Aidan asked if this means there are 8 octonaughts?
We looked it up. There are indeed 8…Inkling, Dashi, Tunip, Tweak, Peso, Kwazii, Barnacles, and Shellington. Anya enjoyed turning her sausages into circles. This
led us on to making numbers, including the number 10000000. That’s a lot of zeros! Shows you how much Anya enjoyed making circles! Who knew that exploring shapes could be so much fun!

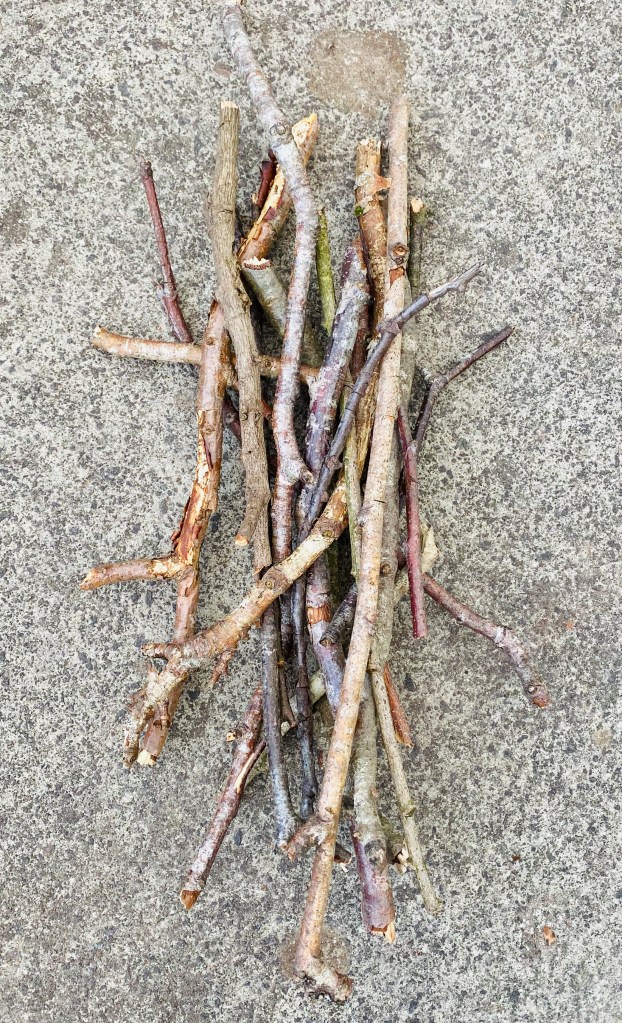
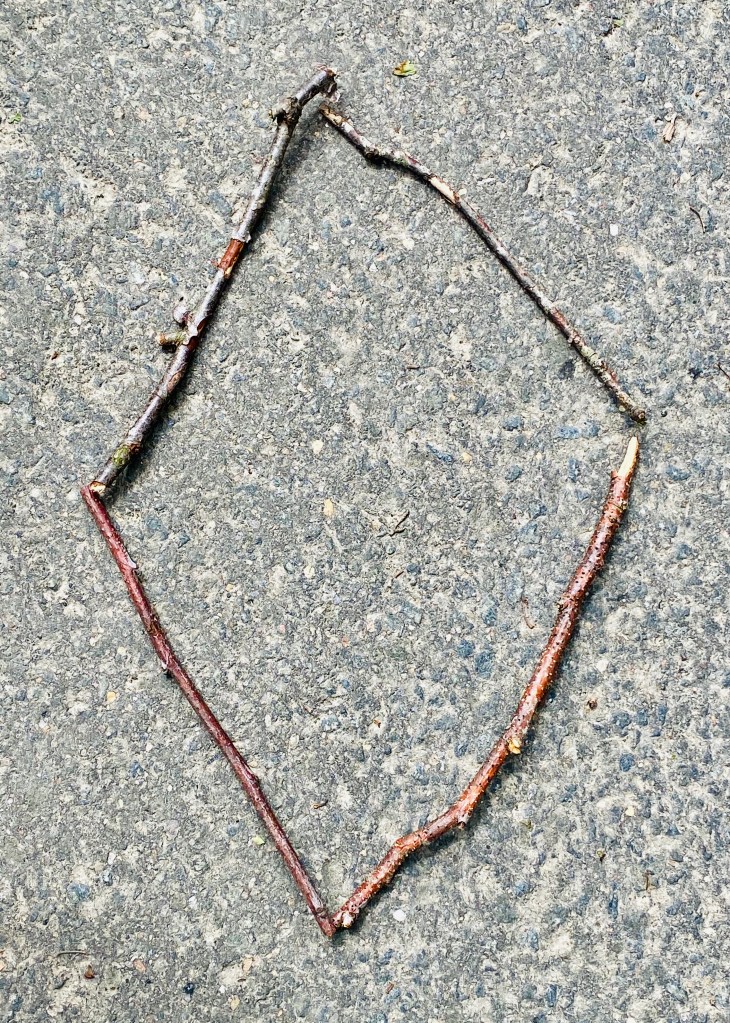
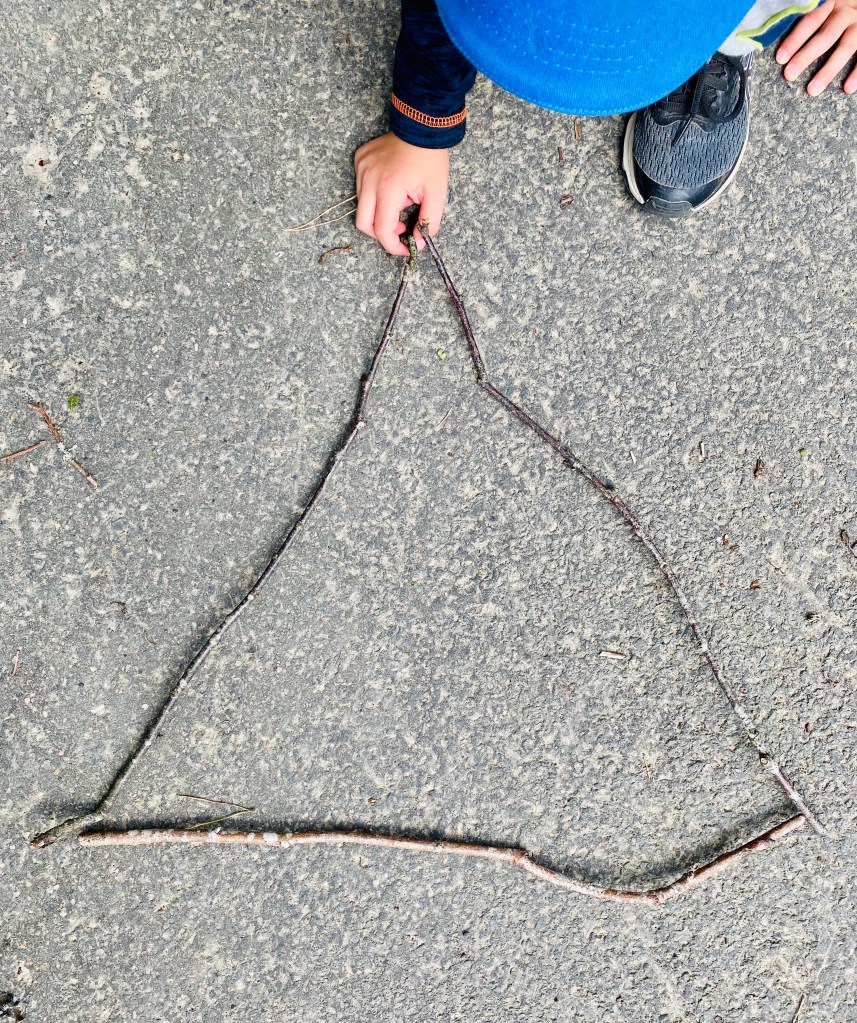
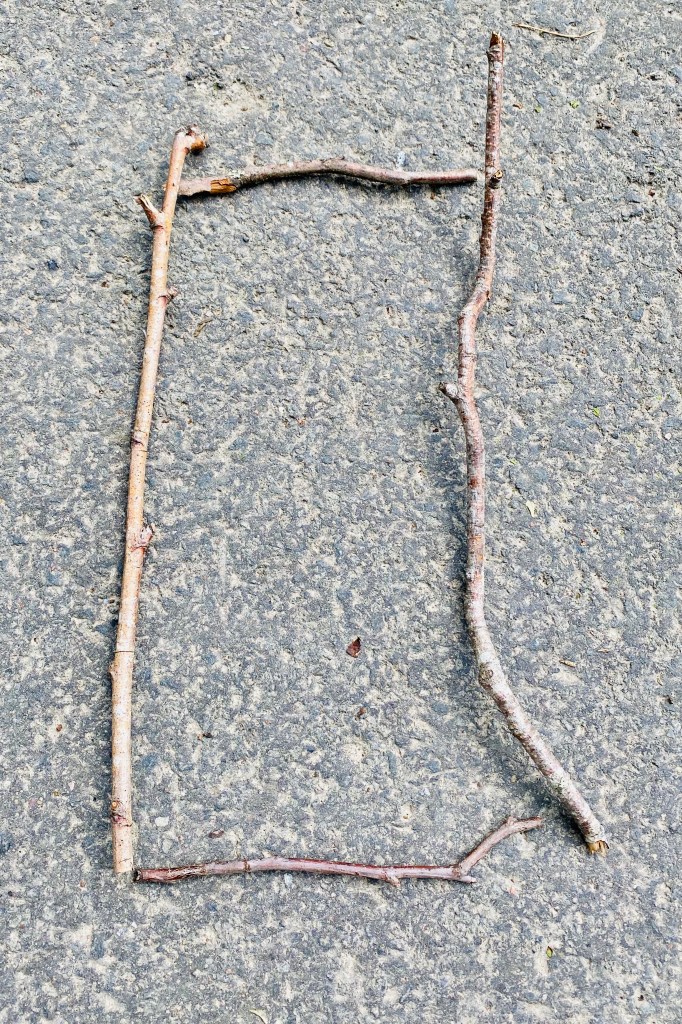
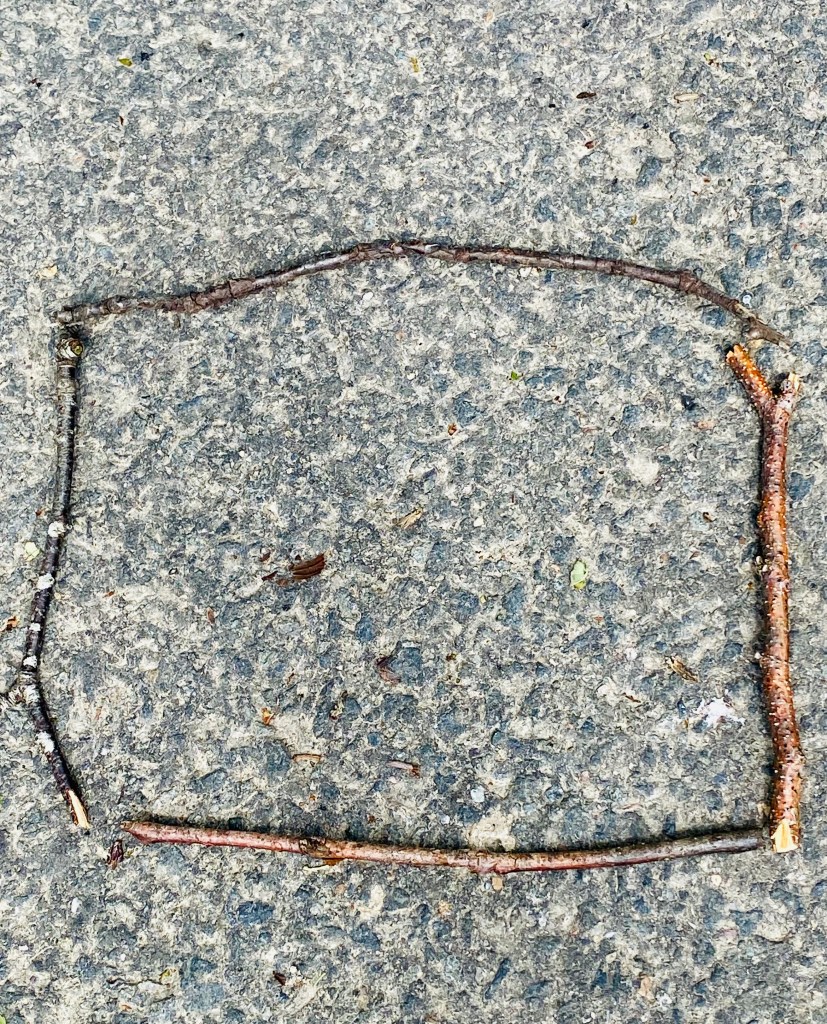
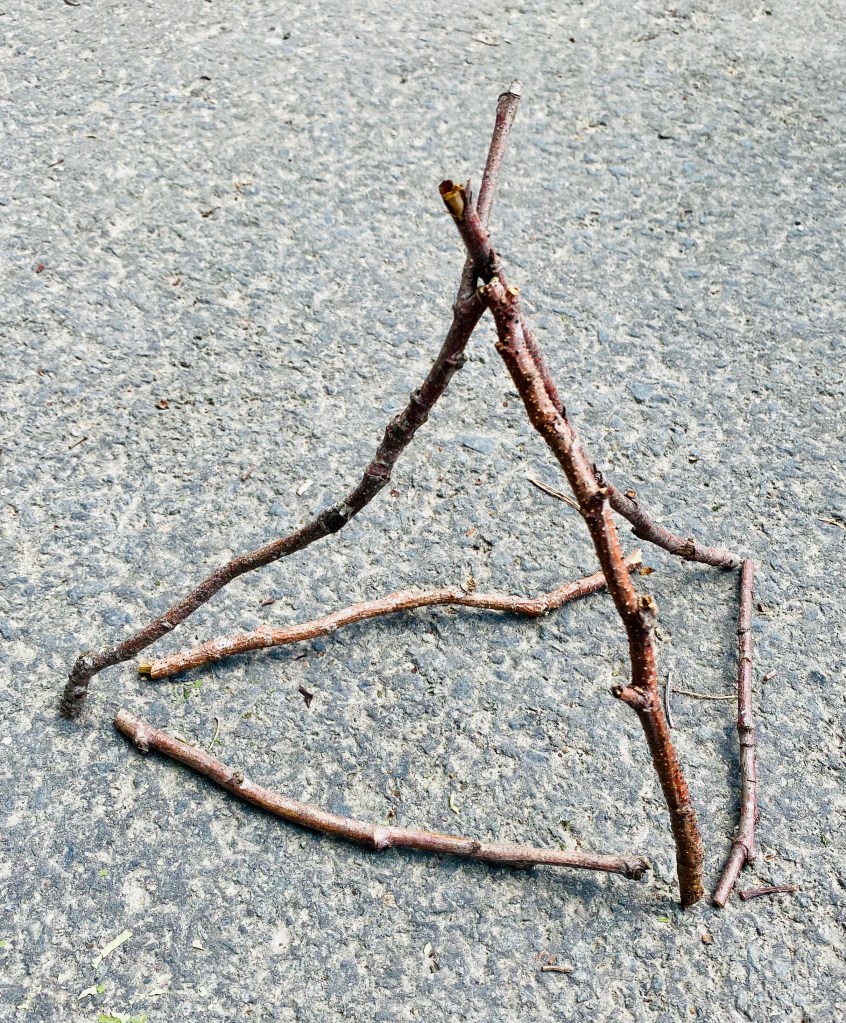
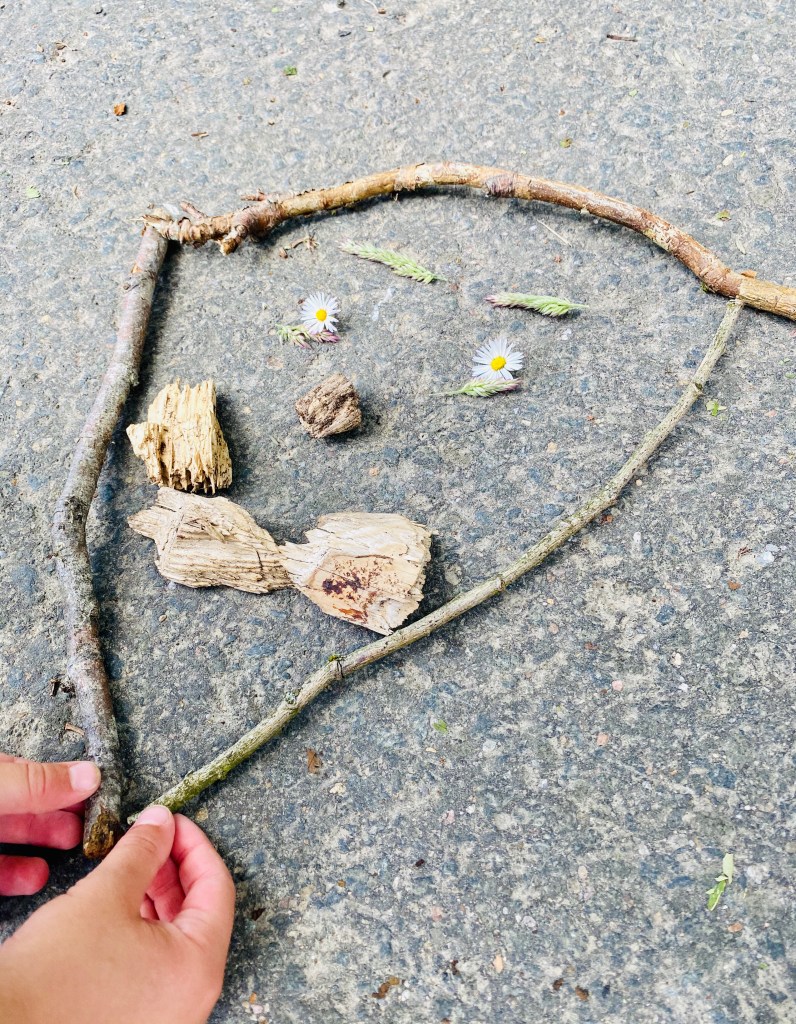
Outdoors we decided to try and make our own shapes using sticks. It was fun – although a circle seemed impossible with the sticks we found! And it took us ages to make the 3D shape (triangular-based pyramid) but it was a great challenge. We then moved on to creating numbers and finally an Emotion Face using natural objects.

Activity 3
Graphs
Indoors
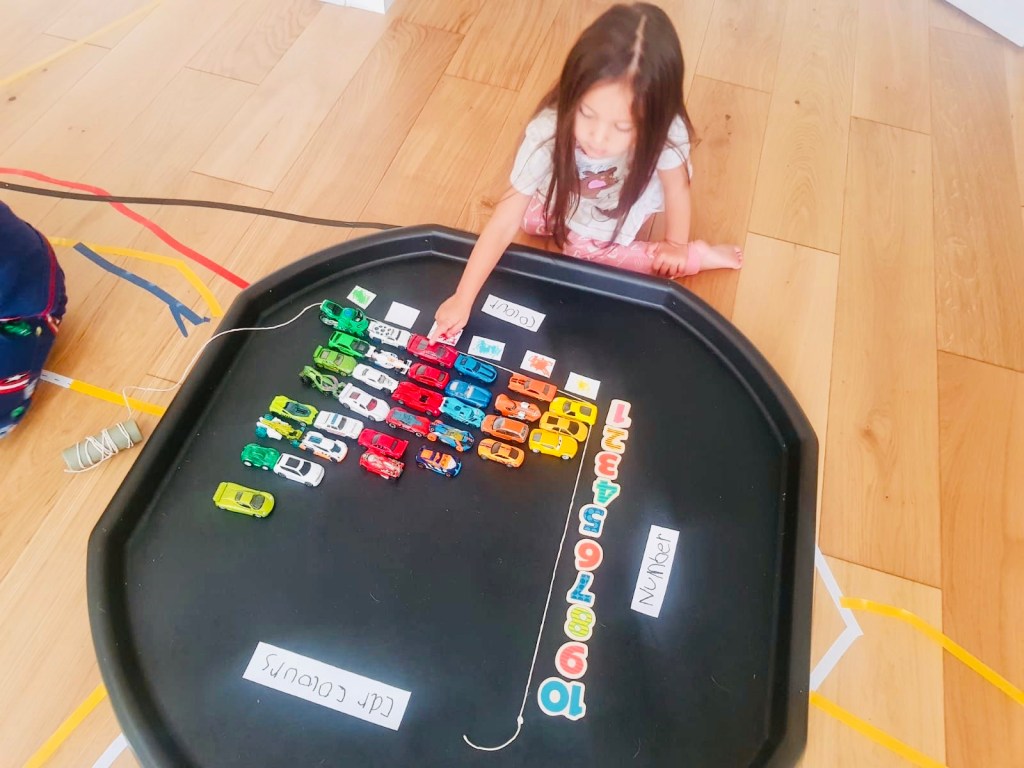
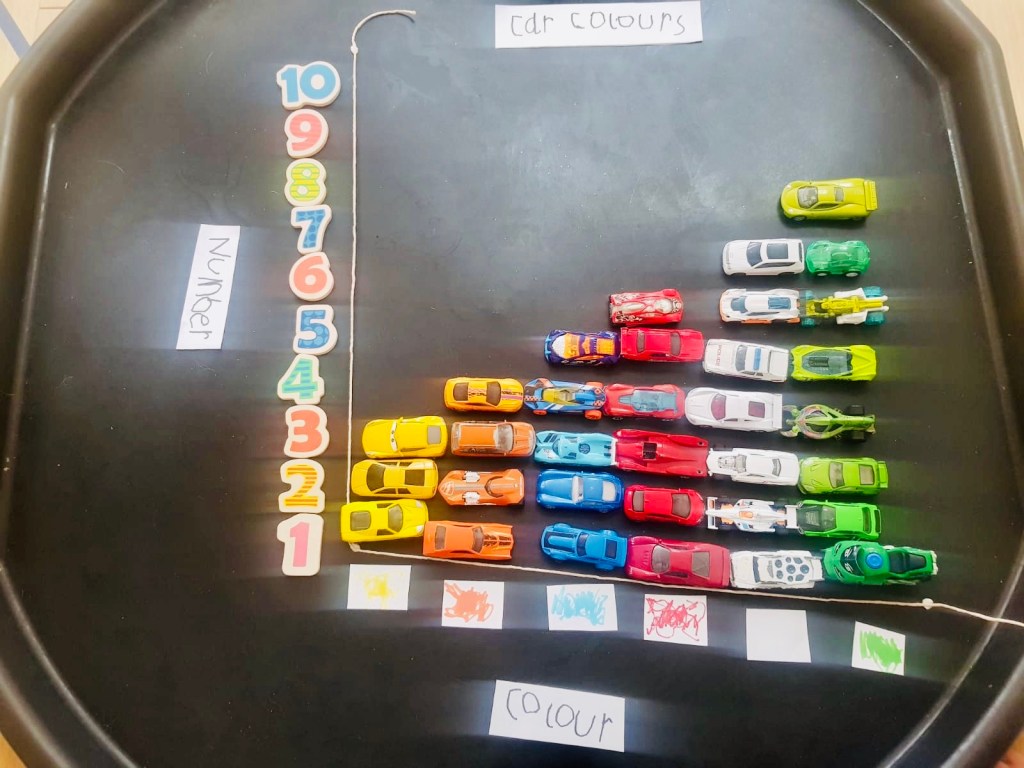
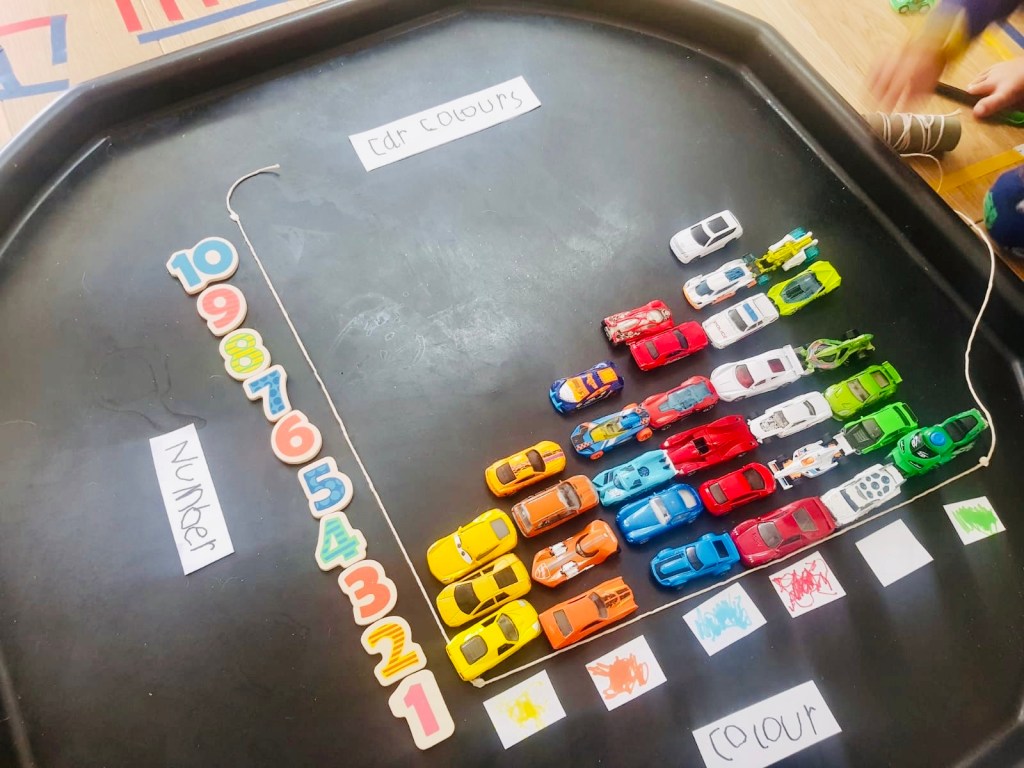
You could use:
- Cars (or something similar) of different colours
- String or ribbon
- Paper and pens
- Blue tac to help hold string and some of the cars in position

Outdoors
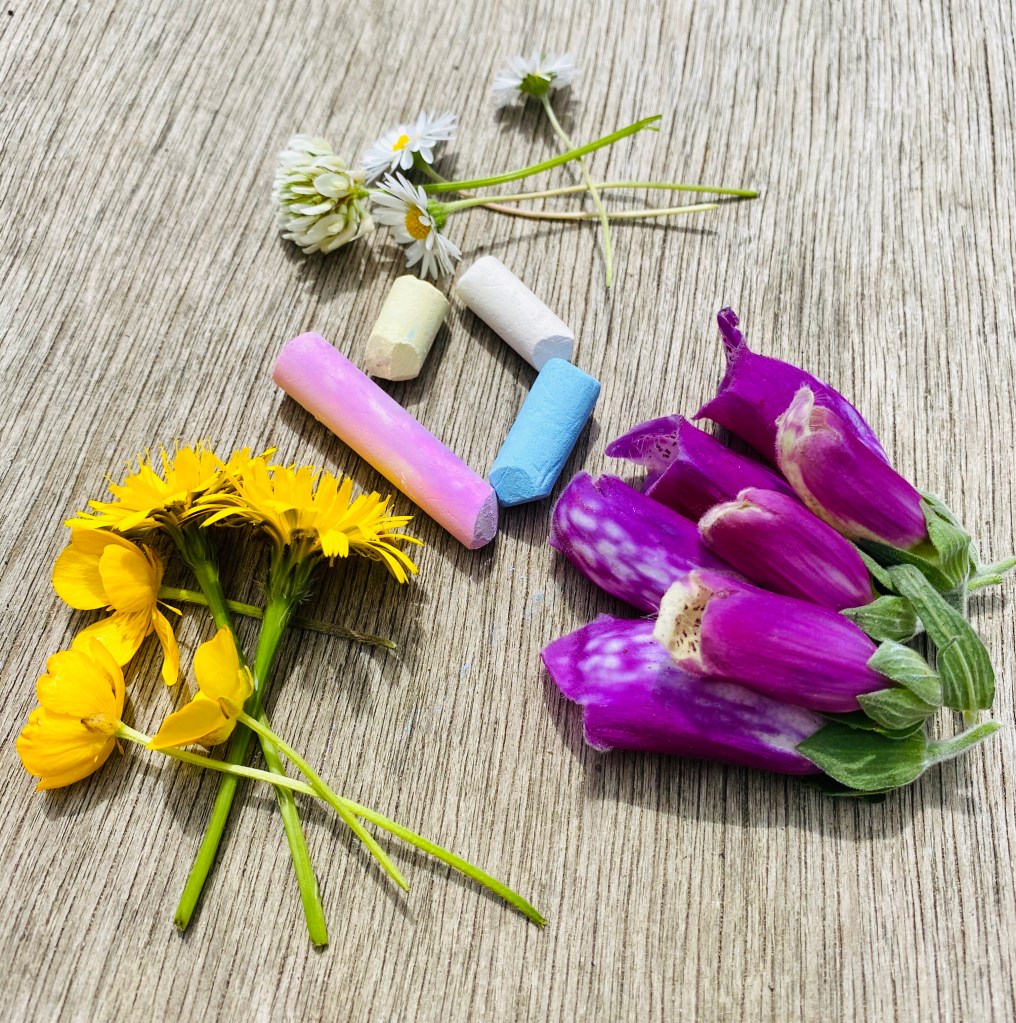
You could use:
- Flowers
- Chalk
Graphs are everywhere – and with the rise of infographics (and fake news!) it’s becoming more important than ever to be able to accurately decode information.
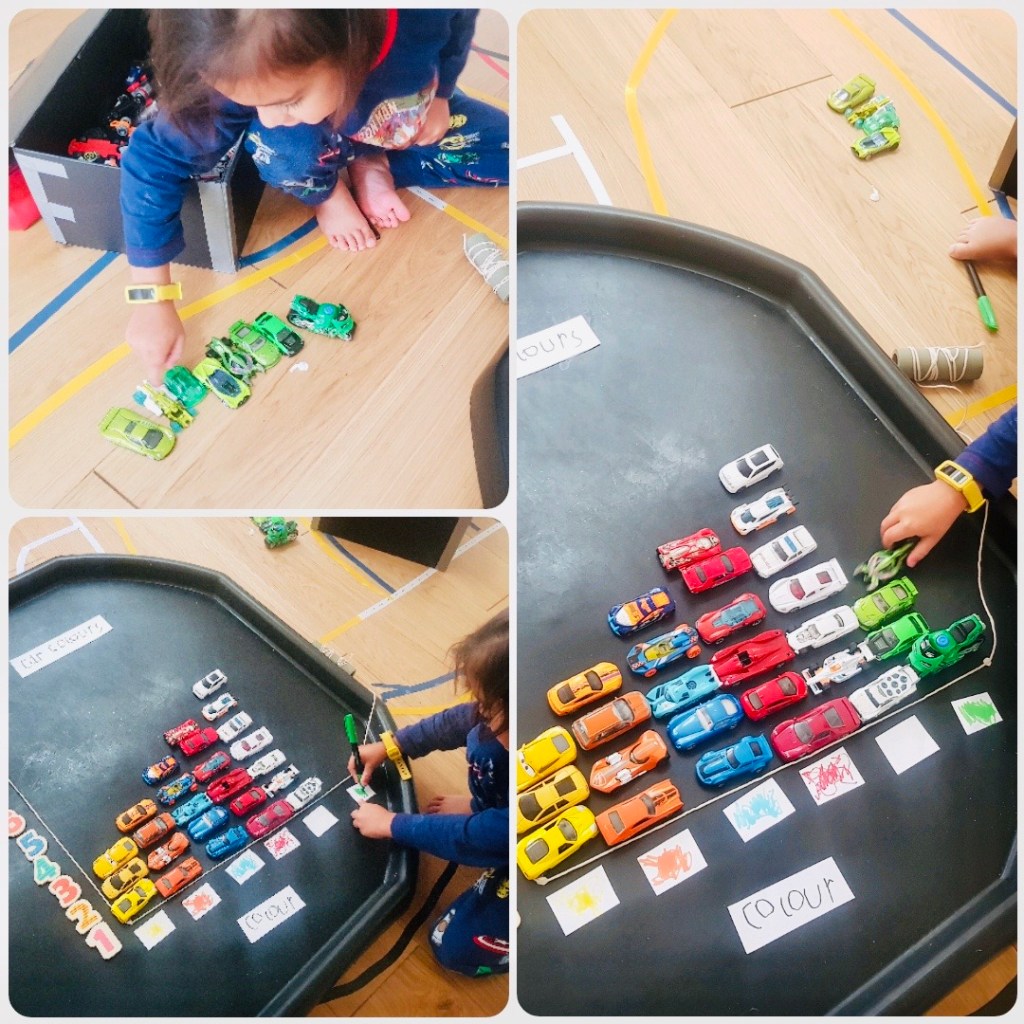
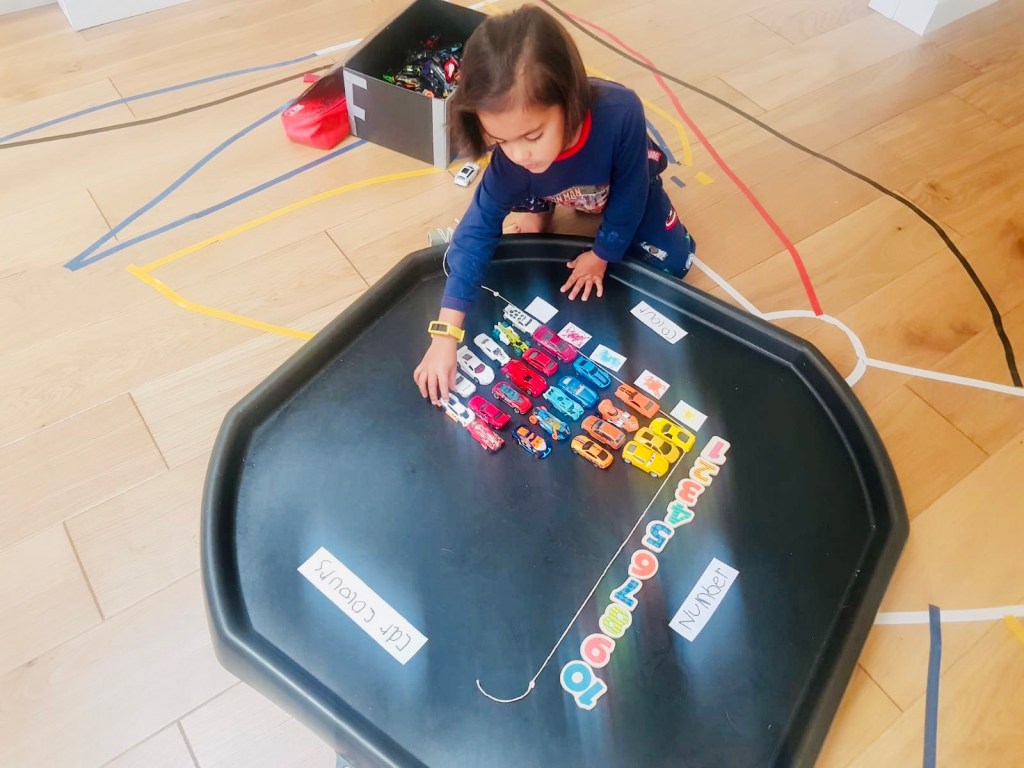
Indoors We had a look at some bar charts and block graphs online and decided to make one to show the colours of our toy cars. We used some string to make the axes of our graph and after discussion, Aidan wrote out our headings. We decided we needed a title so people knew what the graph was about. We thought “car colours” would
work. After a rummage through the car box, we made some groups of colours to use. Anya made the colour labels and we found some numbers from a puzzle for the vertical axis. We laid our cars out, making sure that they were corresponding correctly with the numbers and each other. Aidan loved doing this so much he went on to add two
further columns. They both also enjoyed answering questions I asked from the graph. Anya was able to tell me what there were more/less of between two choices and could count individual columns. Aidan liked working out the difference between the numbers
of cars of different colours and said it was much easier to work out on a graph. We looked at more images of charts again online after the activity and there was a massive improvement from both children in their understanding. Success!
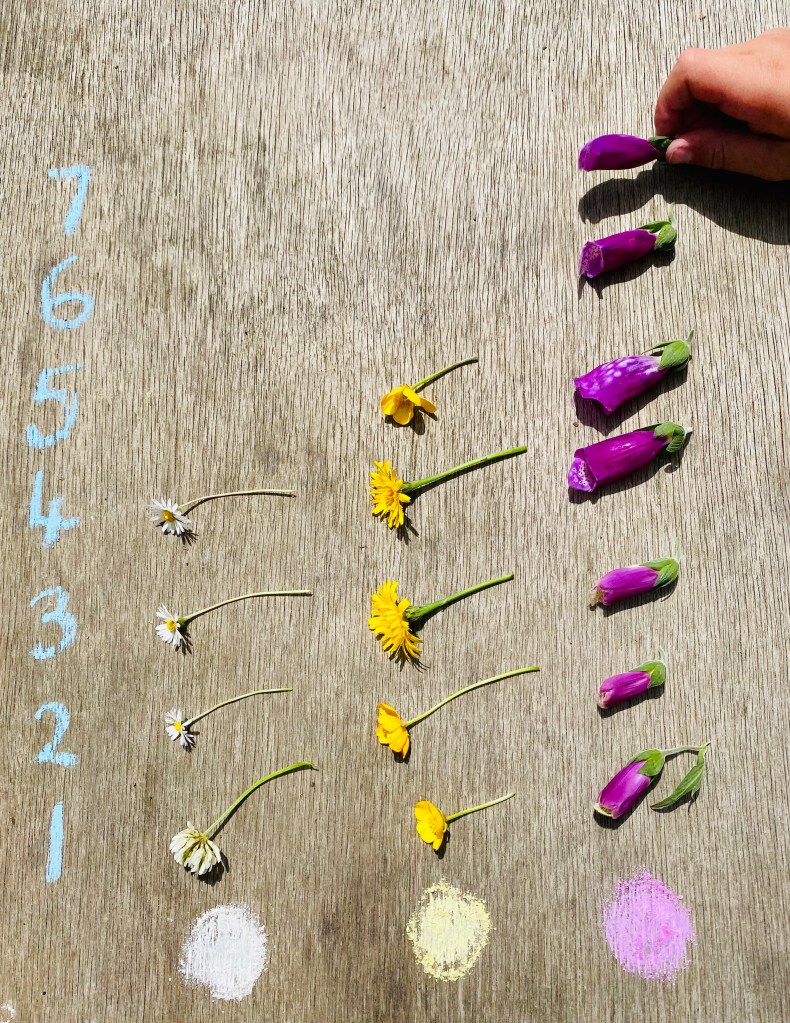
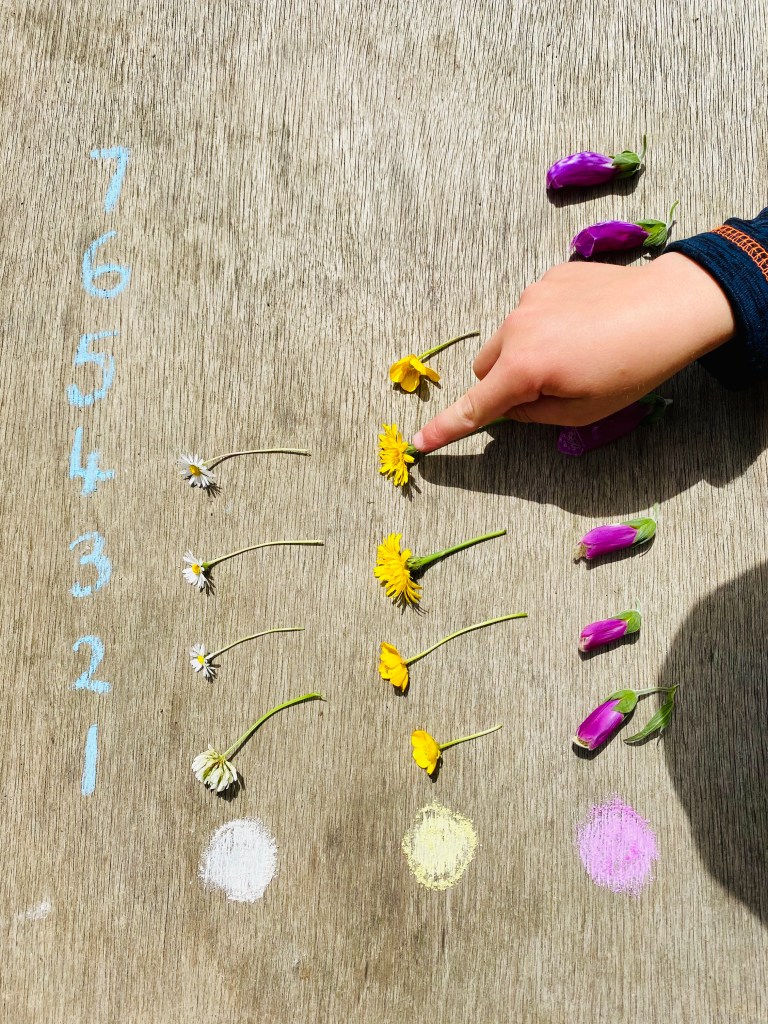
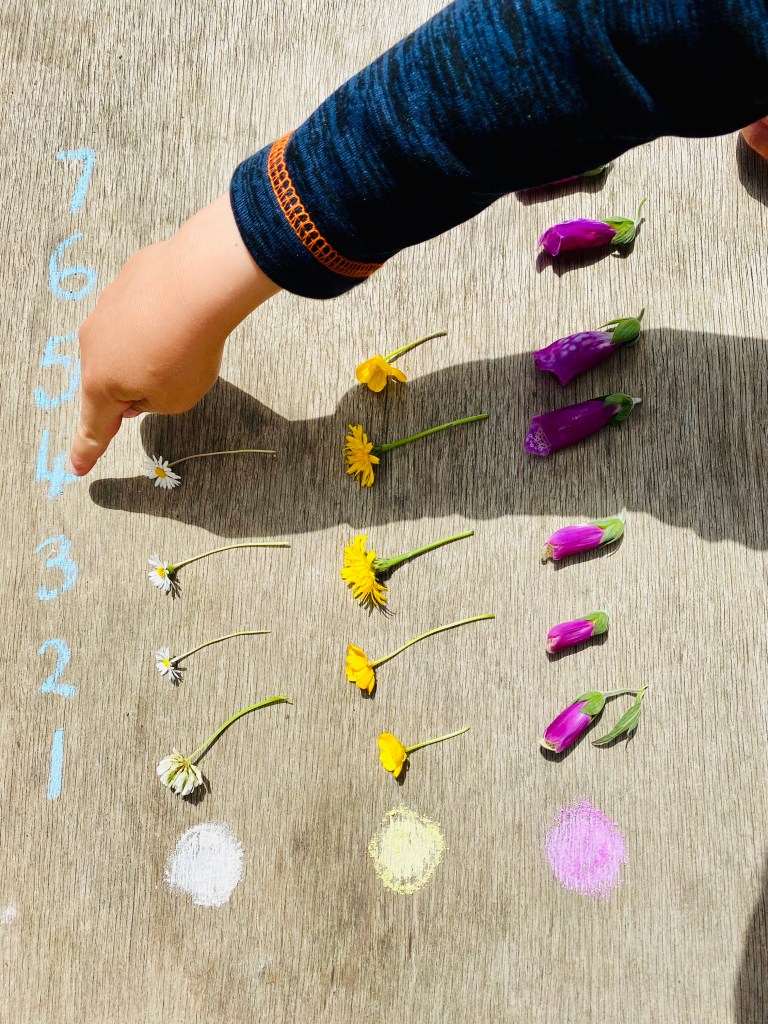
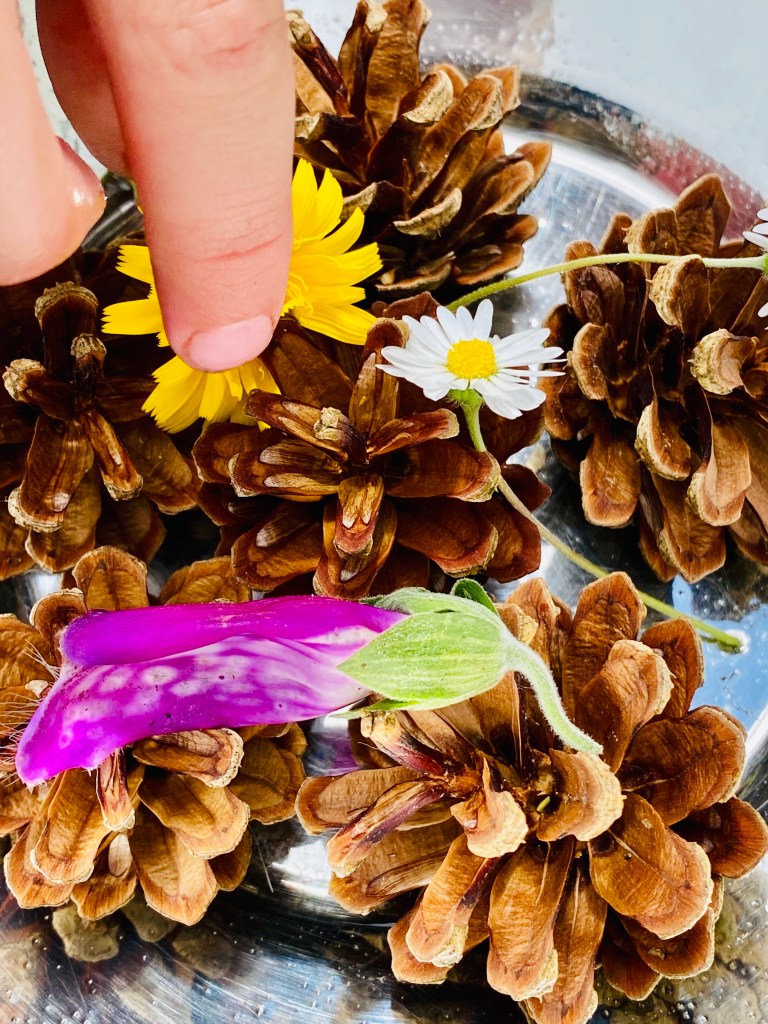
Outdoors we used some beautiful flowers that we’d found in the woods and organised them into colour groups (as my youngest wanted to join in (age 2)) – however you could make as many (and as complex) categories as you like depending on the abilities of your children. We talked about the x and y axis, and how graphs are used to generalise and group objects/items. Once we had sorted the flowers into categories, I asked questions about them (for example ‘How many yellow flowers?’ or ‘How many more pink flowers than purple flowers?’).
Activity 4
Recognising Dice Numbers
Indoors
You could use:
- Paper
- Pens
- Dice
Outdoors
You could use:
- Dice
- Bowl
- Chalk
- Random wild items
It’s such an important skill to recognise dice numbers – and you’ll be astounded at how quickly your kids will recognise each face and not need to count out each dot after just a few rolls.
These fun activities provide creative ways to get your kids using dice and counting without even knowing they’re learning.
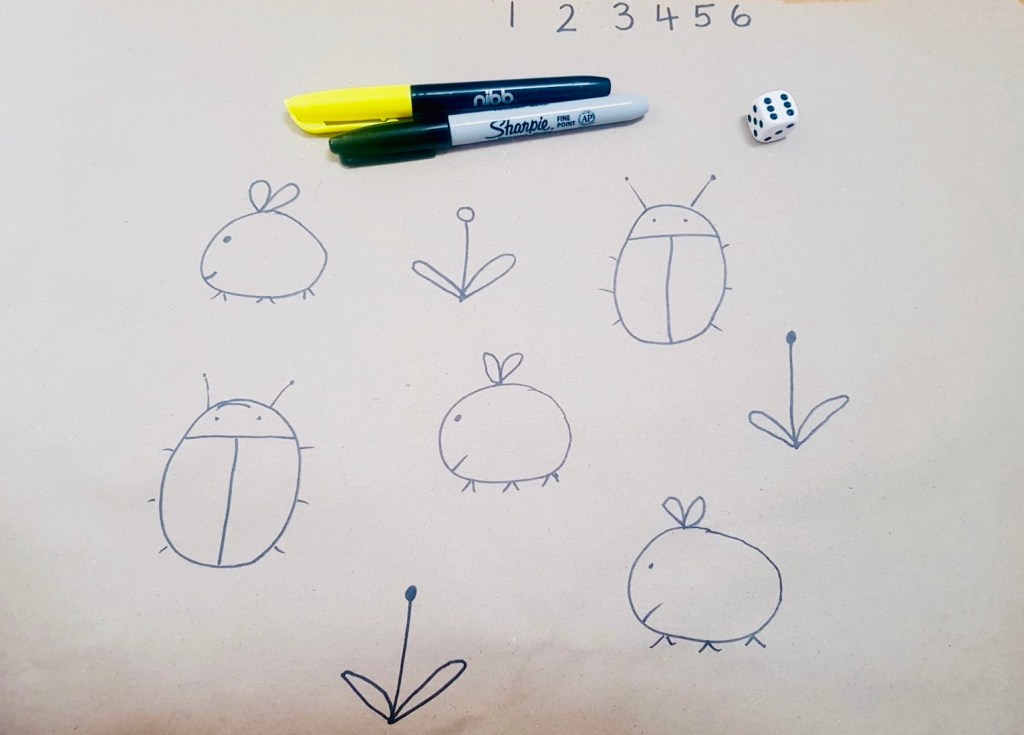
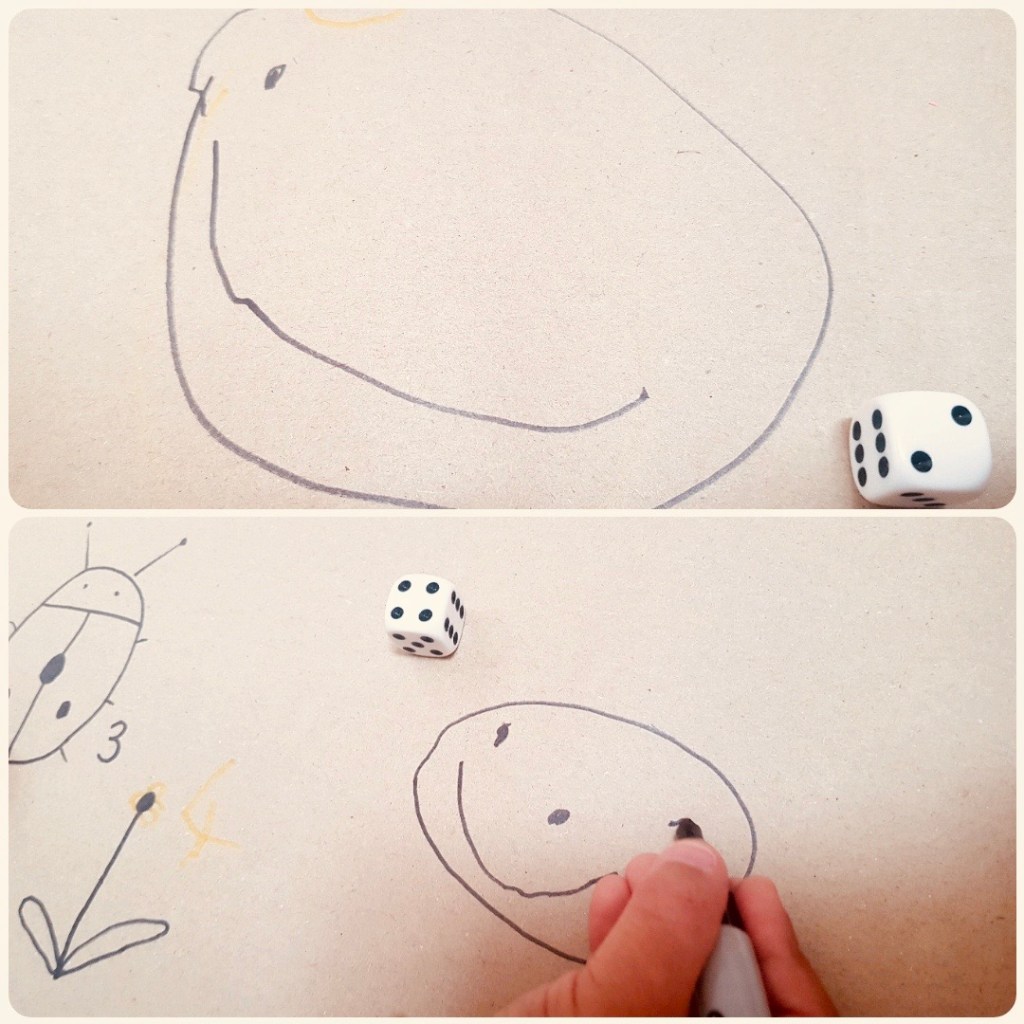
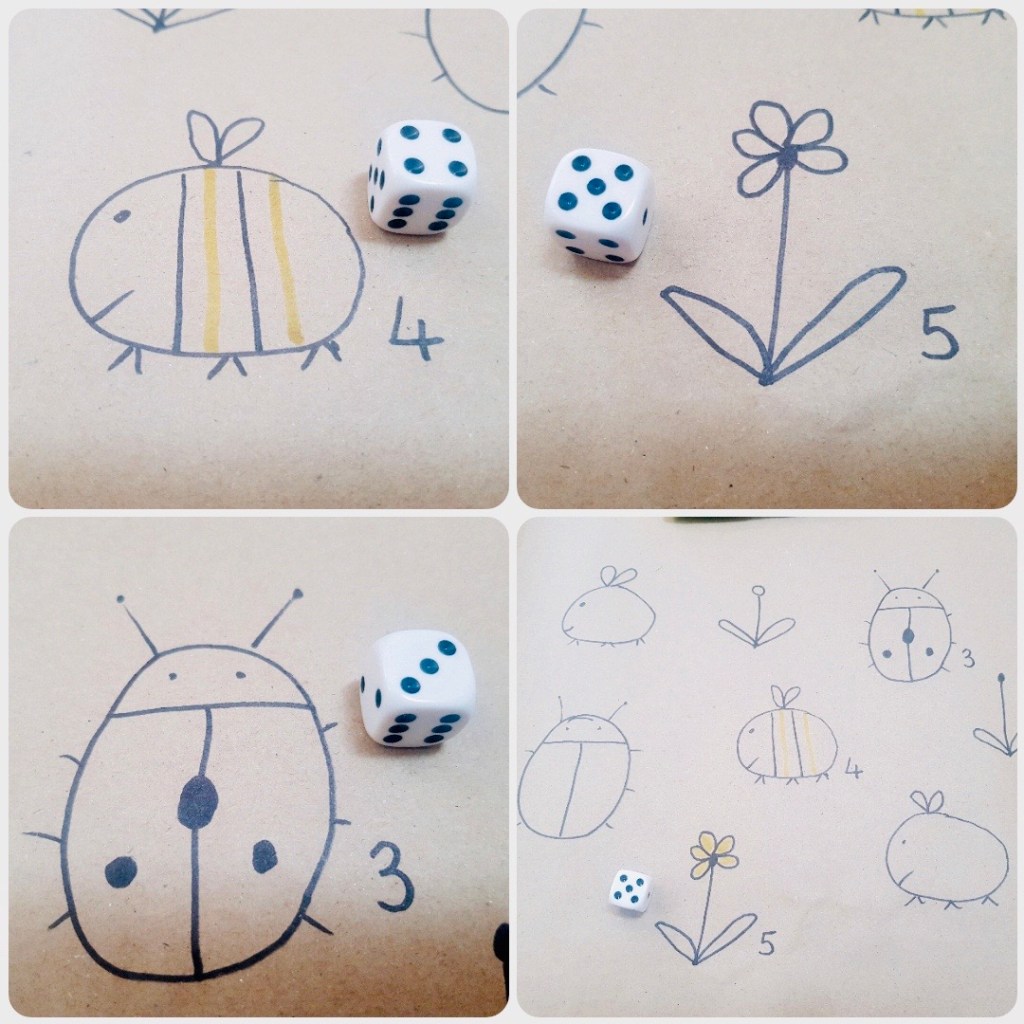
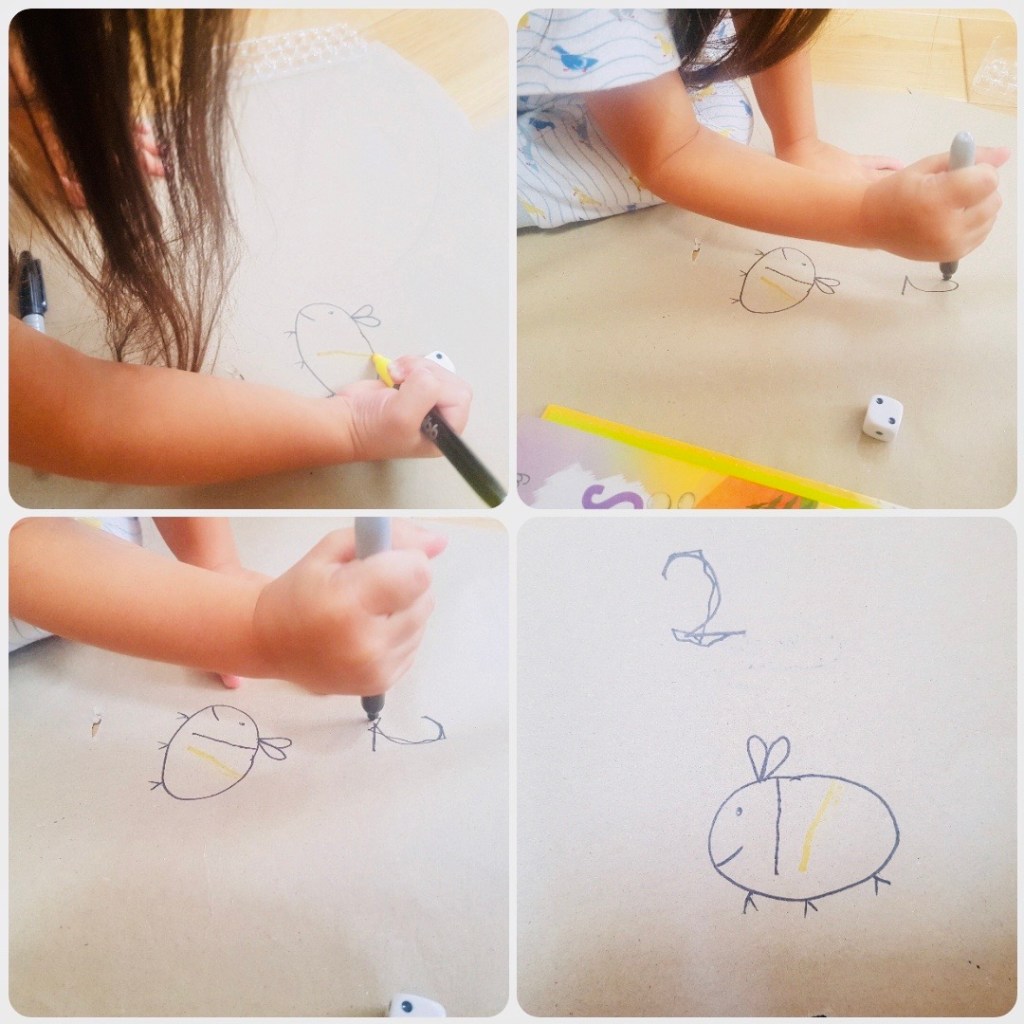
Indoors I drew some different things on paper after being inspired by @prekwolfpack on Instagram. We went for bees, flowers and ladybirds (Aidan later added faces). All you have to do is throw the dice to get a number (we also practised writing down some of the numbers we rolled). For the ladybird you add the corresponding number of spots. Did you knows ladybirds are usually symmetrical? If they have an odd number of spots the odd goes across the middle! For the bee we added stripes, alternating between black and yellow. The number you throw on the dice tells you how many stripes to add. For the flower you throw the dice and add the number of petals to match the number you throw. Aidan even invented his own game. Add a number of features to a face depending on the number you throw on the dice. This one was great fun.
To add more challenge you could easily use two dice and add the numbers together!


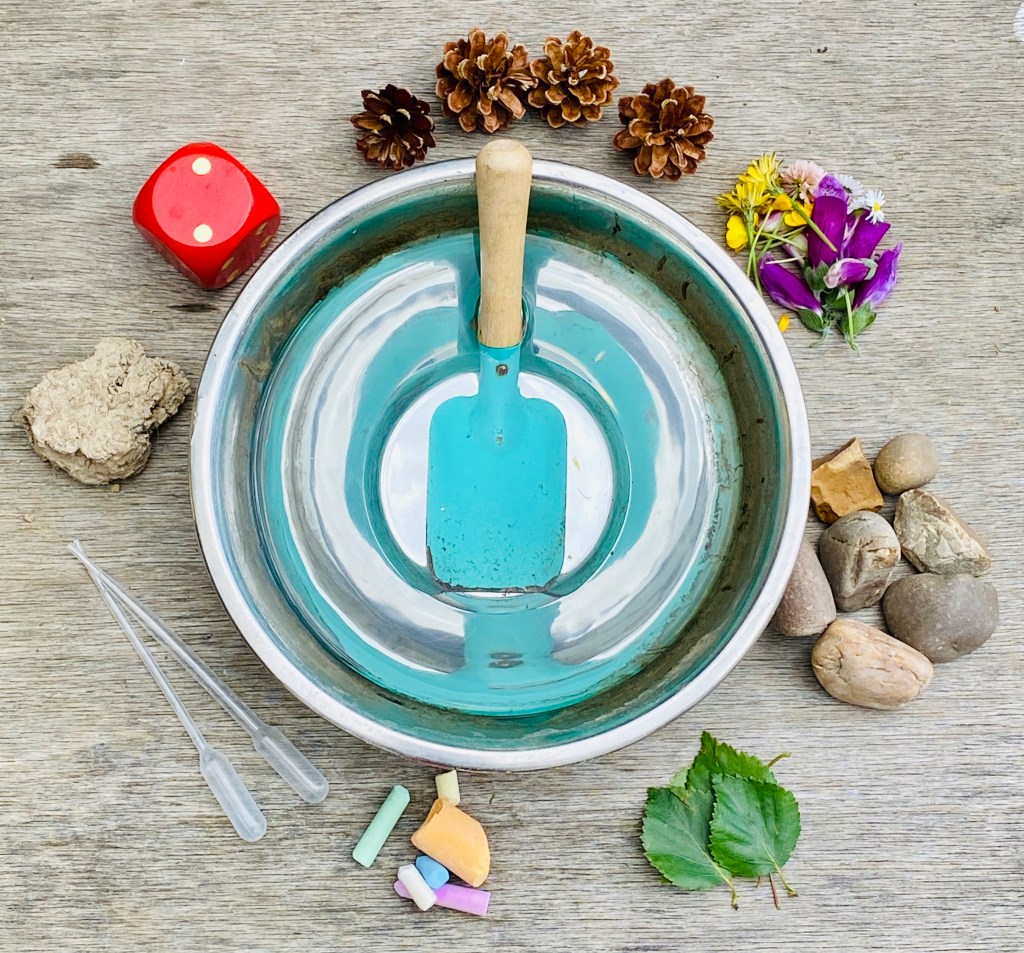
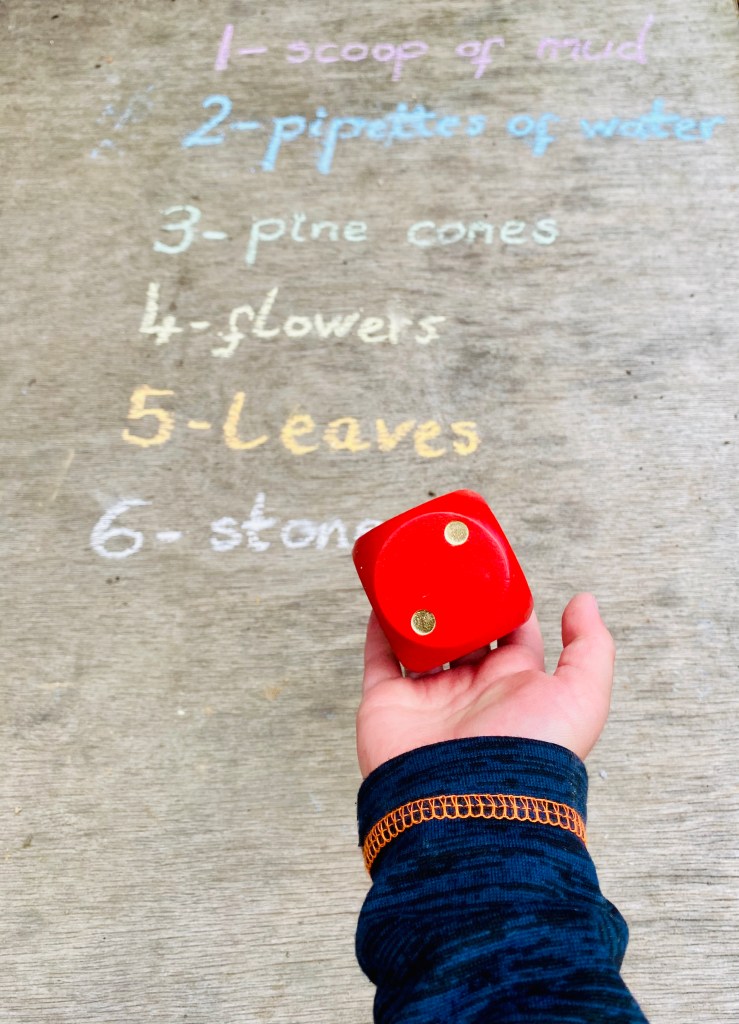
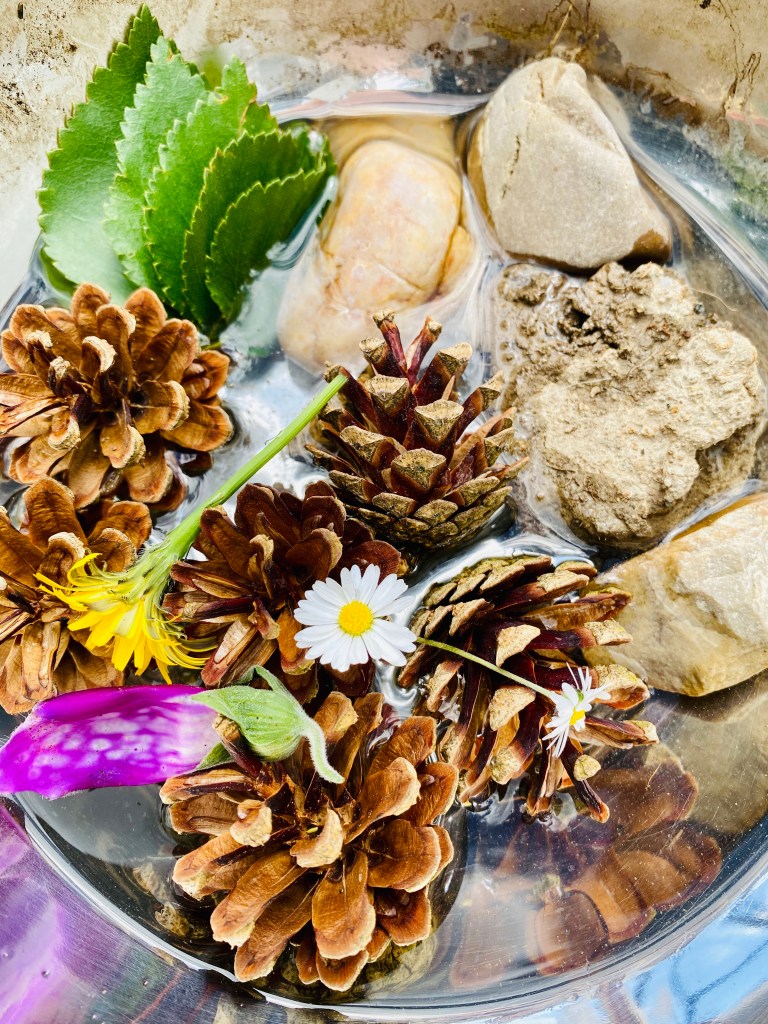
Outdoors we decided to make Perfume Potions – together we agreed on how many of each item we wanted represented by each dice roll and then got to playing. For younger children you could use a dice that only goes up to 3, or for older children you could use 2 dice and add the totals or multiply them together to get the answer.
Activity 5
Number Arrays
Indoors
You could use:
- Card
- Glue
- A pen
Outdoors
You could use:
- Lots of 1 item (eg pine cones/leaves/flowers)
- Number cards (optional)
It’s never too young to start learning your times-tables! Start slowing and start with low numbers – but by using practical resources it makes the entire concept SO much easier (and as a consequence makes learning ‘higher’ times-tables make more sense as your kid already understands the concept of repeated addition).
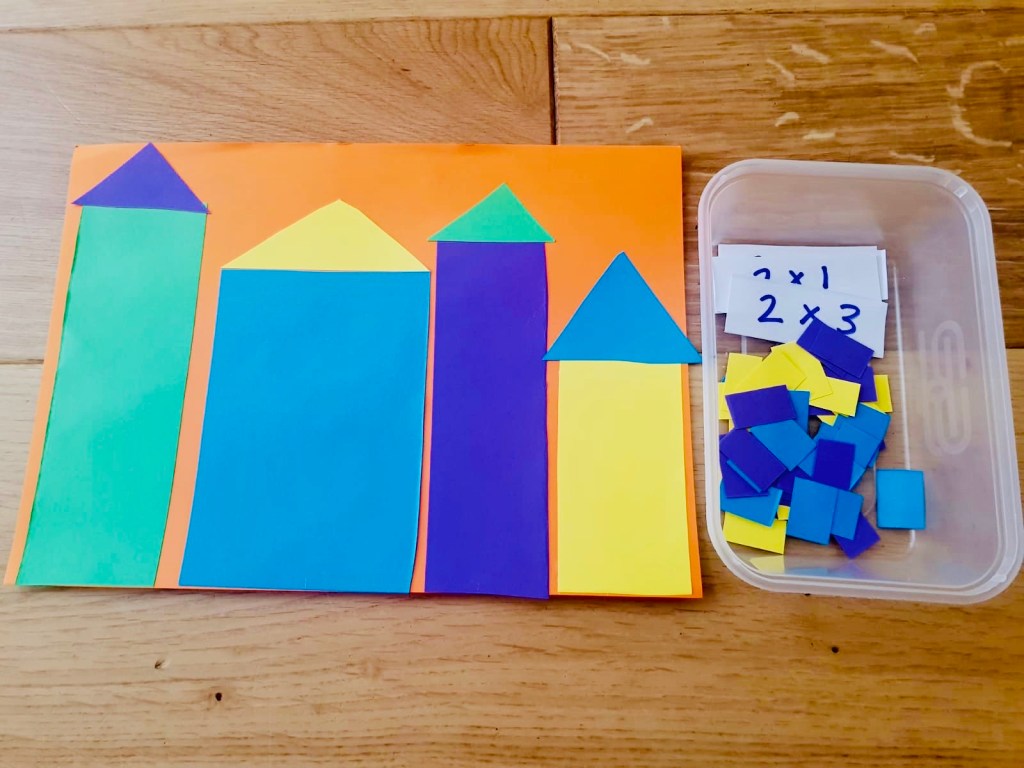
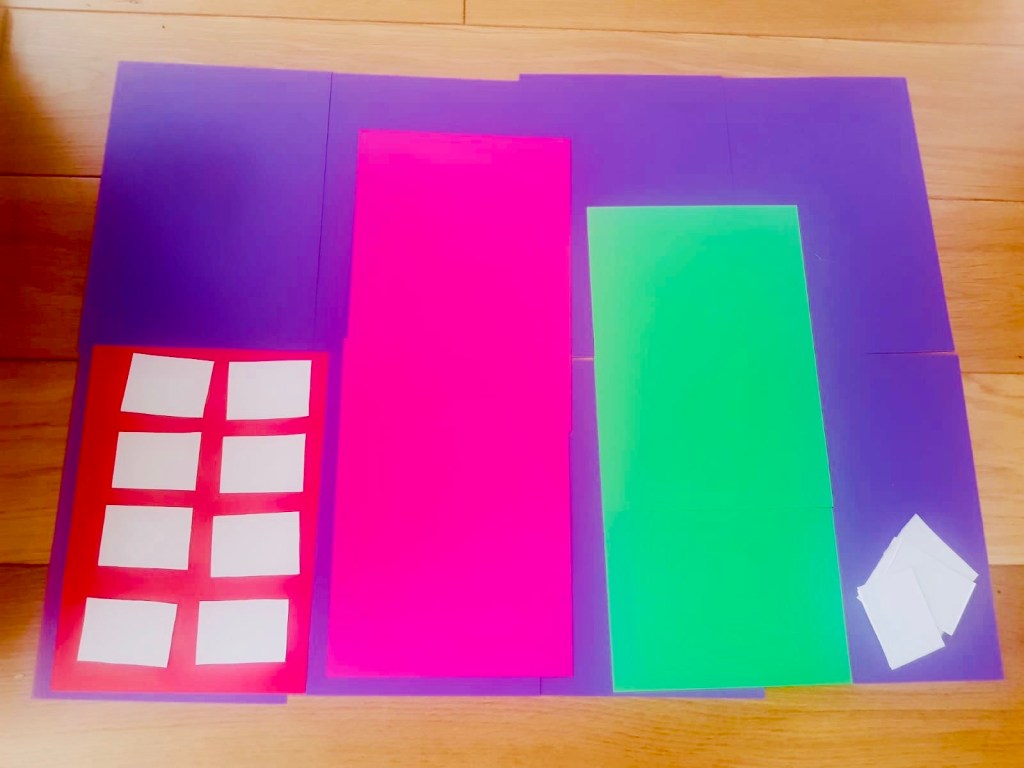
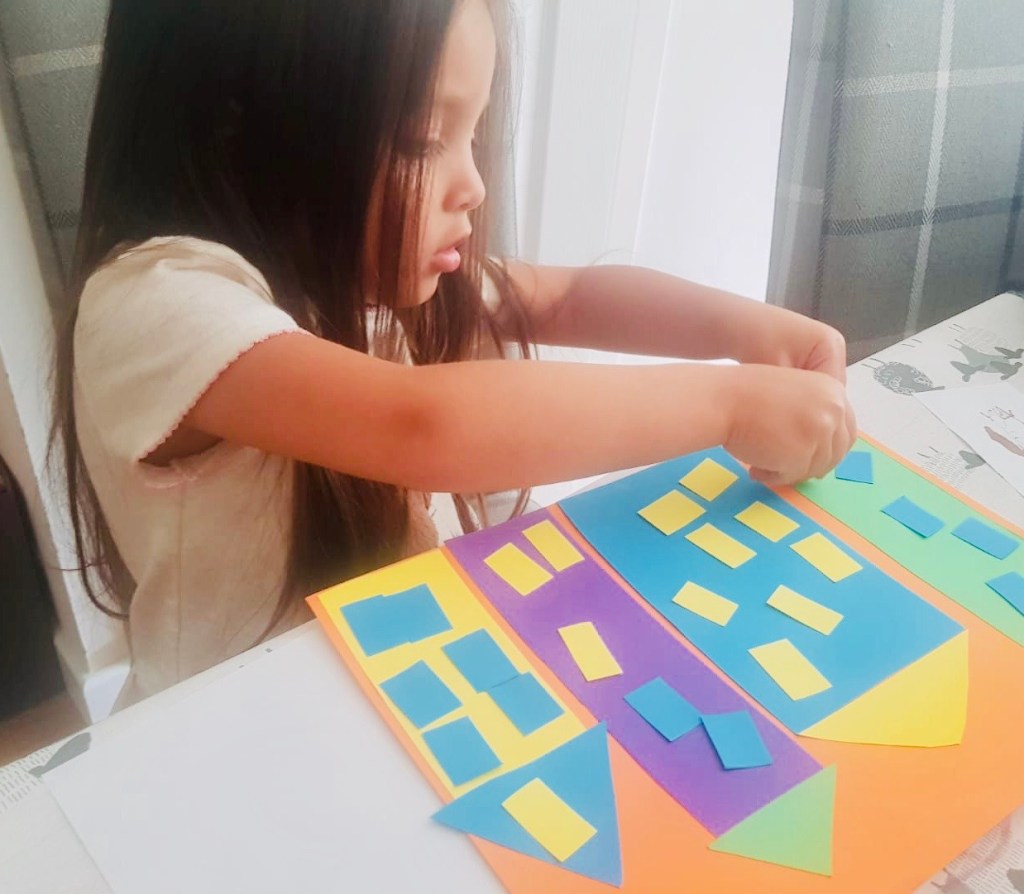
Indoors Firstly I just laid out; on a big scale, some different coloured card, without cutting it, to make it look like high rise buildings on a background. I used printer
paper to cut out squares. I then left the children to explore. They naturally started to lay the squares out on the card, making them look like windows, formed like arrays. After they were finished I could clear the card away, untouched, ready to use another time.
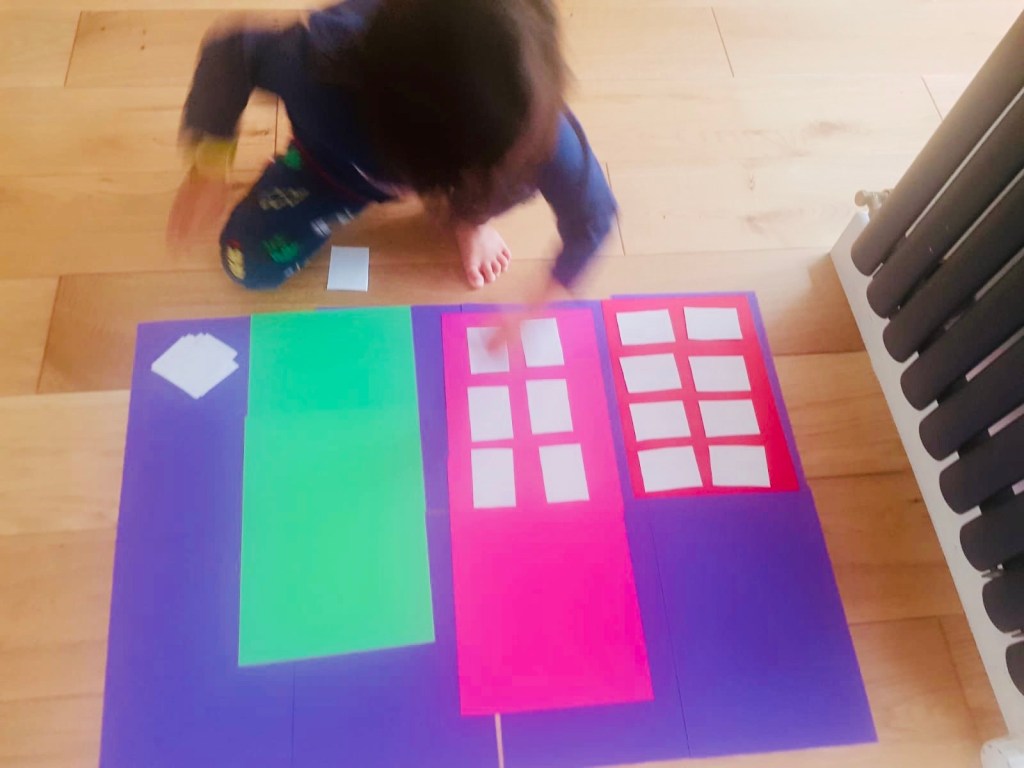
Next, I used a piece of A4 card and glued some rectangles on it to make buildings. I added triangular rooftops. Anya helped me stick and we discussed the shapes and colours. I then cut some little squares to form the window arrays. Anya played with them first and enjoyed decorating the building with windows. She even started to discuss who might live in the buildings and counted the windows she used. I wrote out some 2x table questions and I challenged Aidan to make arrays. He even considered the size of the question, putting smaller multiplications on smaller buildings. I love how this activity gives you a concept of what multiplication actually means and a real feel
for the quantity of the groupings rather than just rote learning your times table. The beauty of this activity too is we have kept it and can reuse it again and again
with different multiplications. For Anya I may put in some simple numbers to use next time and she can try and match the number to a quantity by adding the correct number of windows.


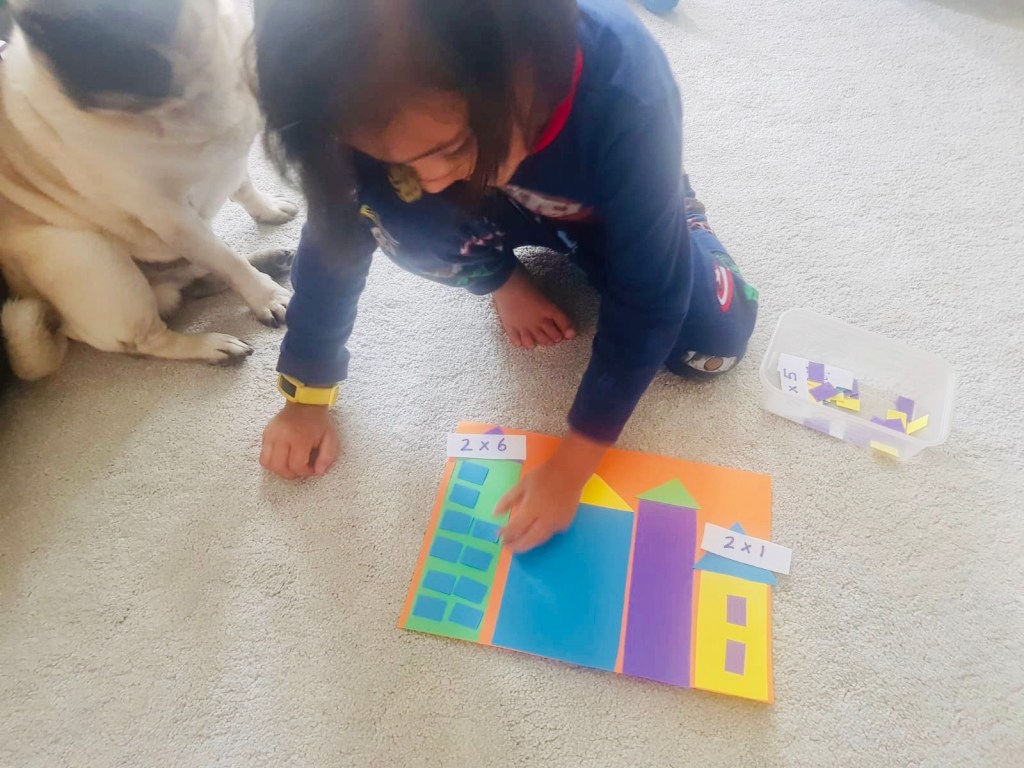

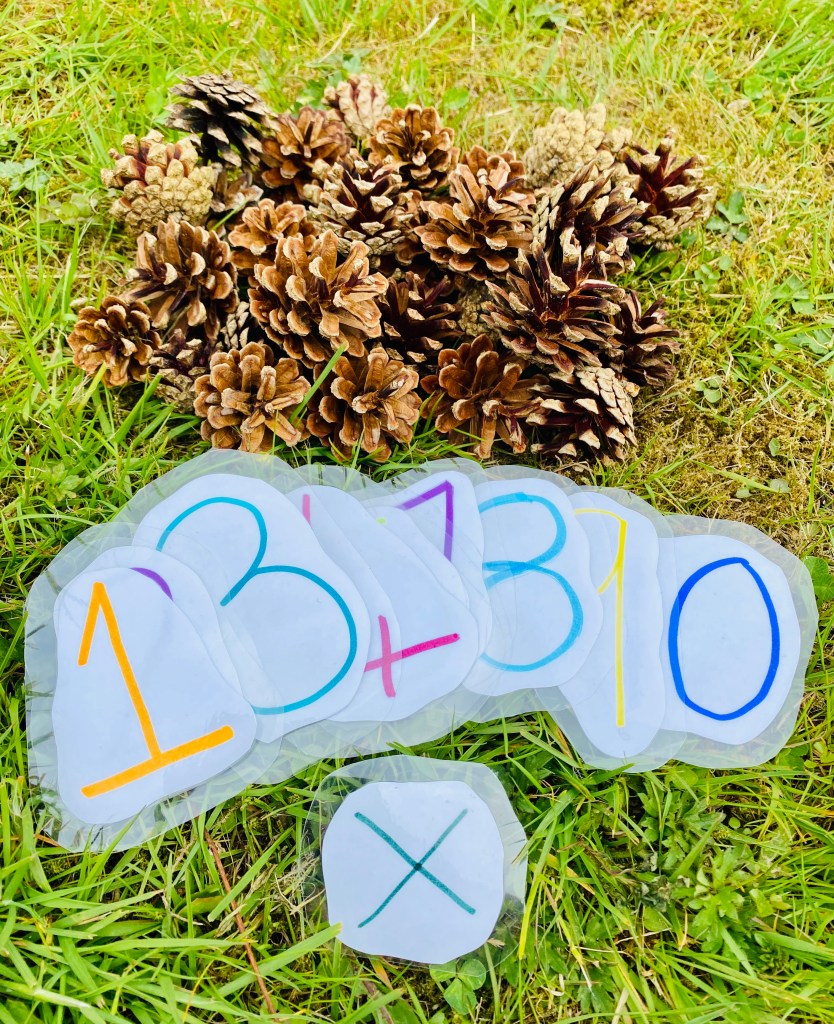
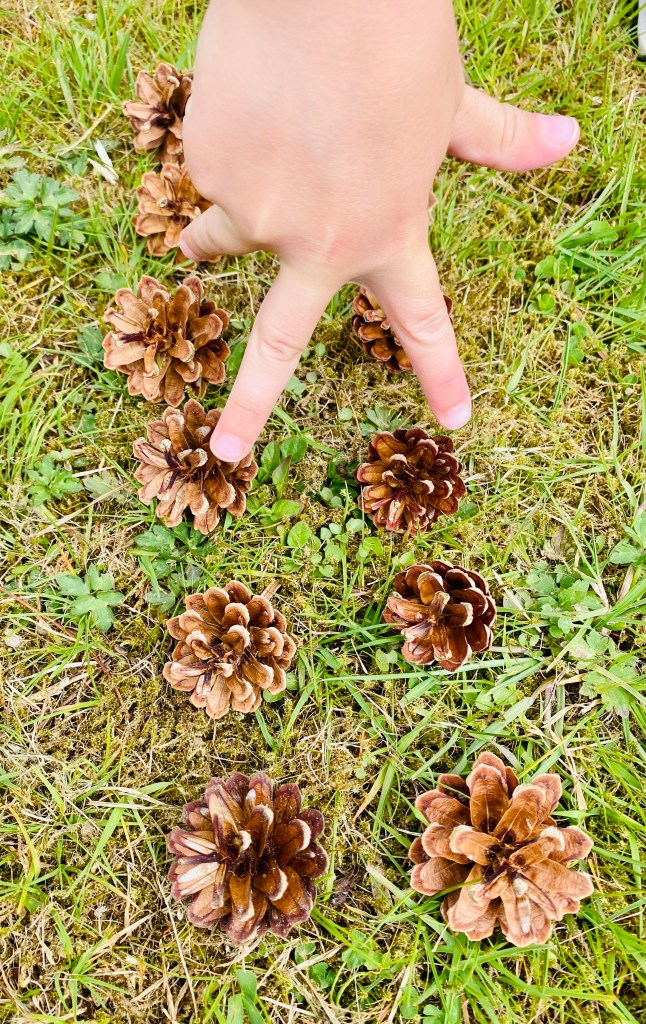
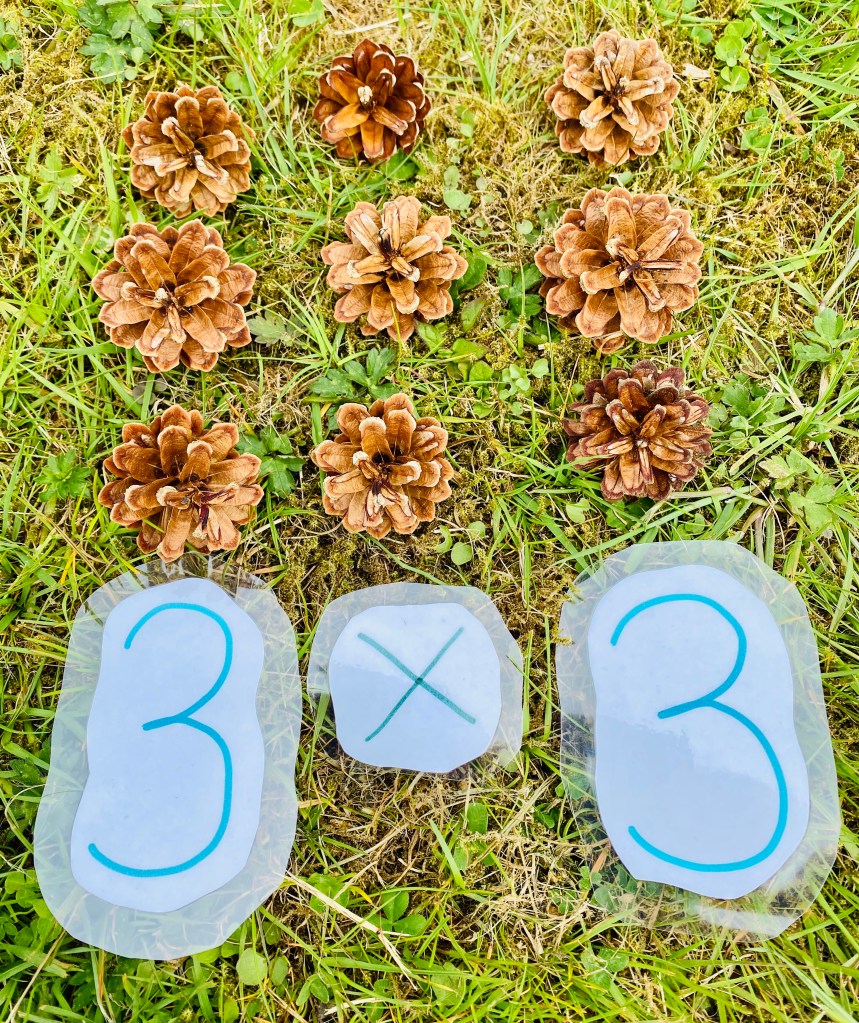
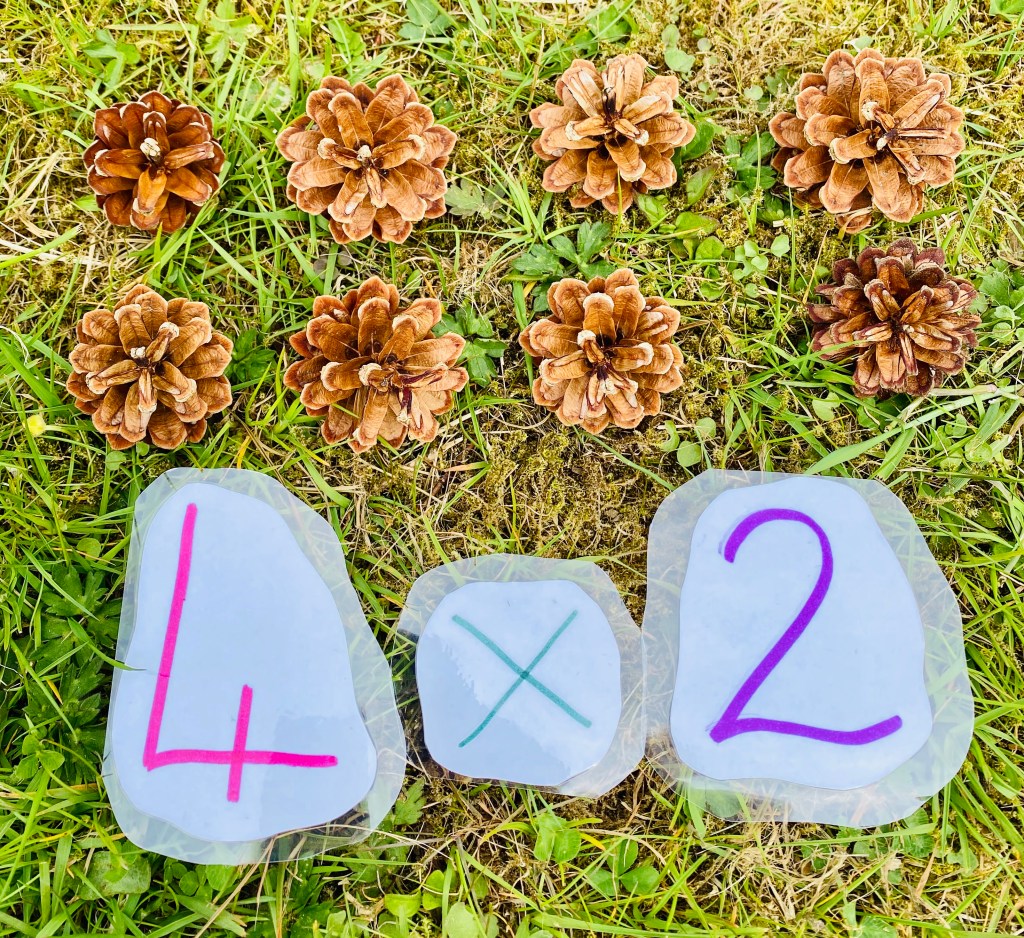
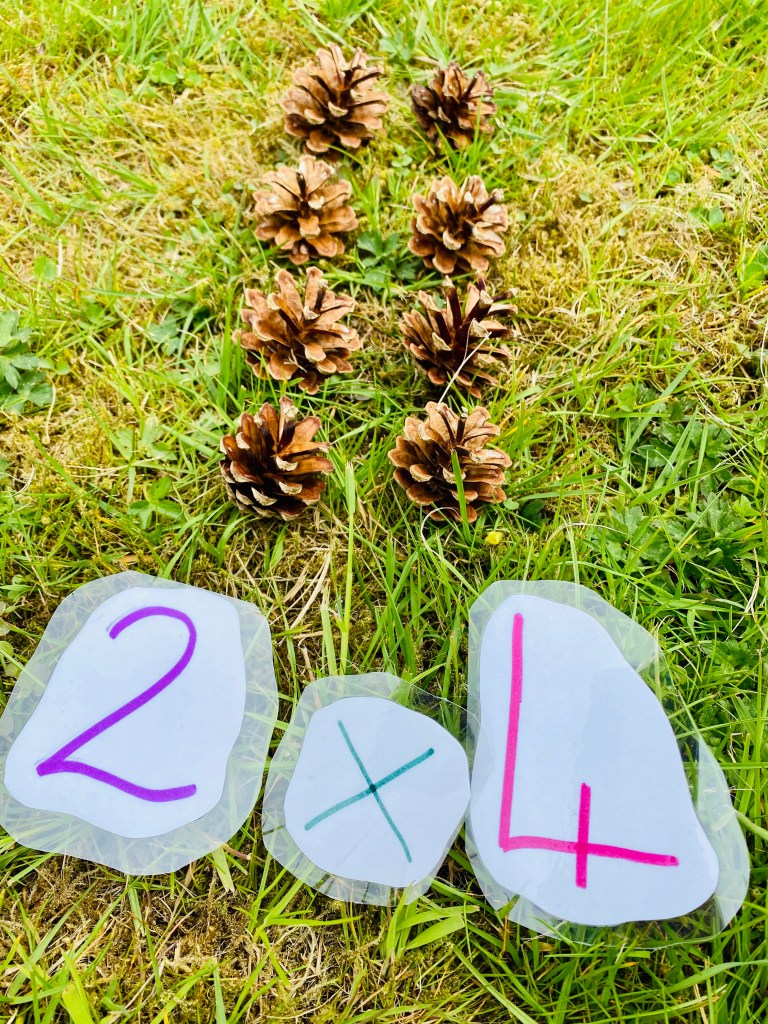
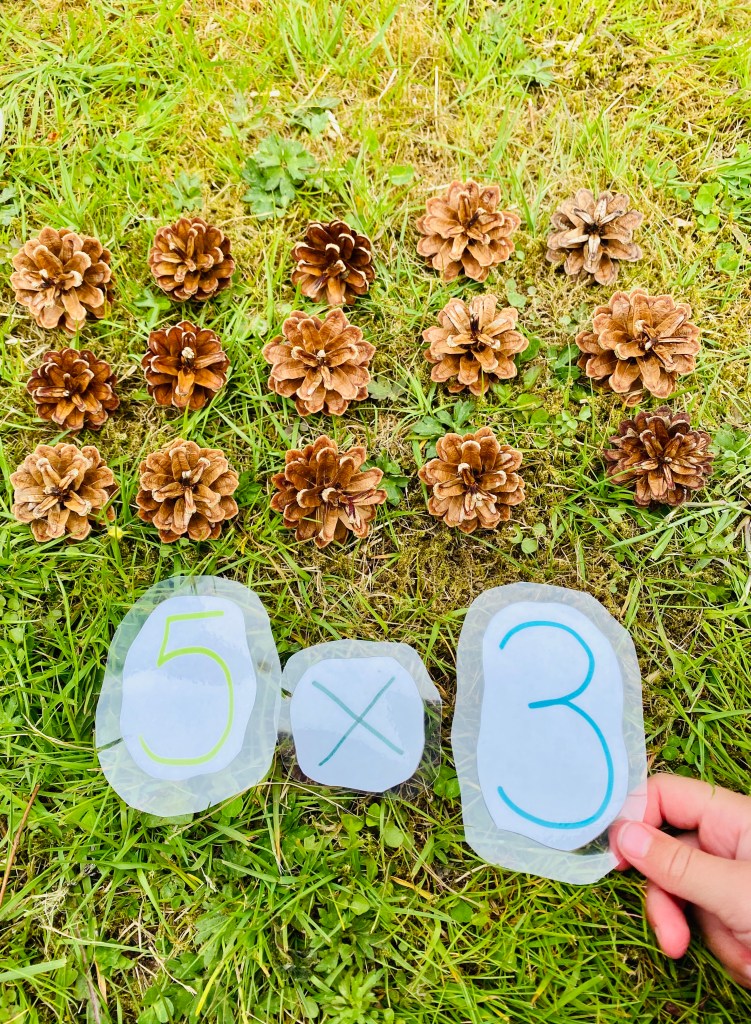
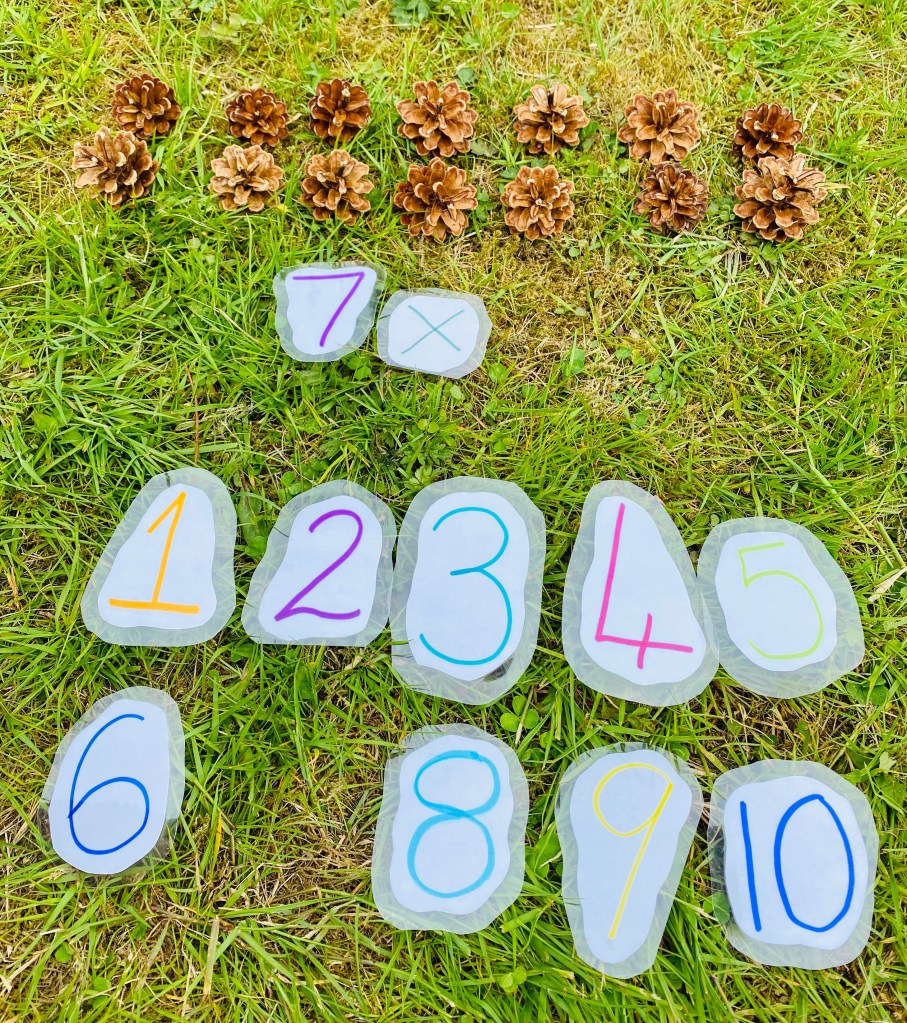
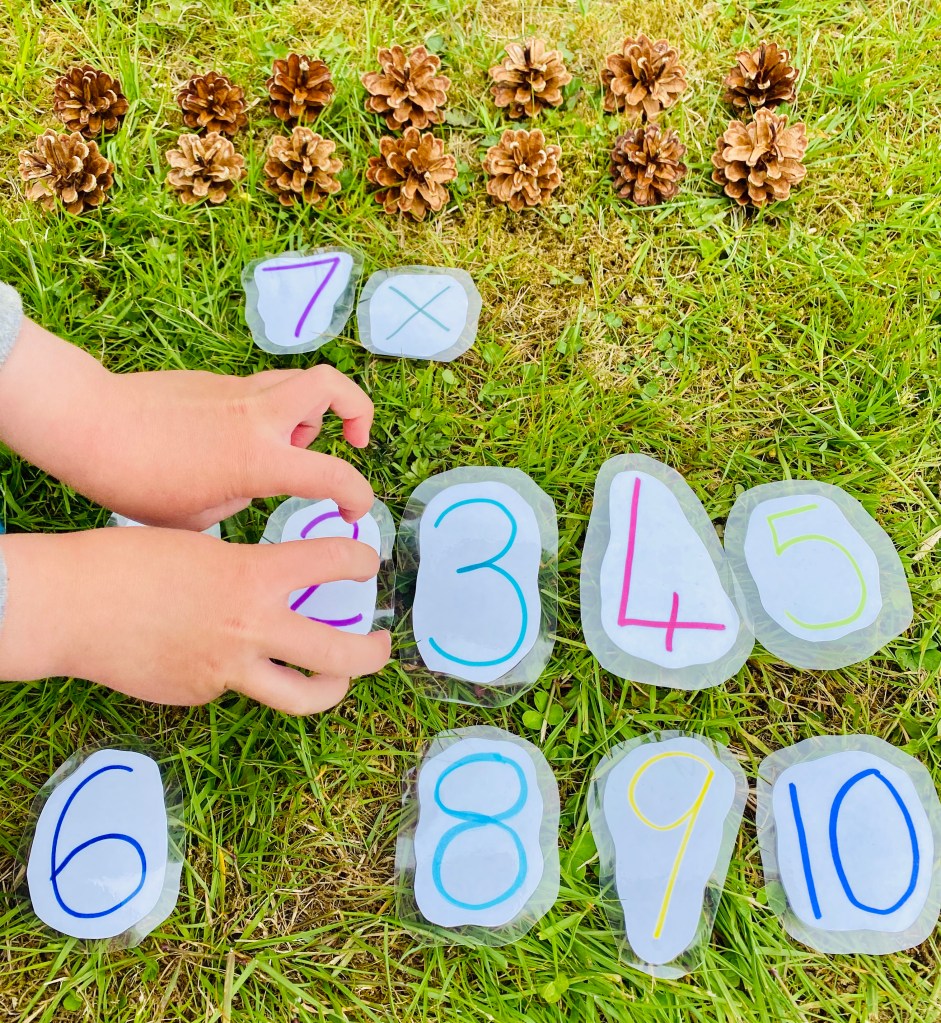
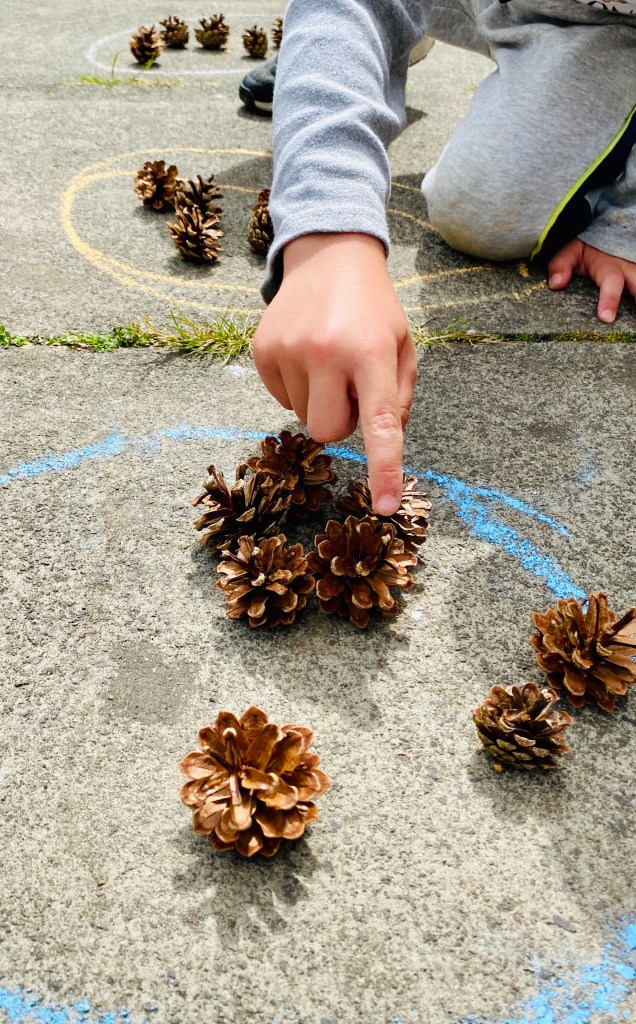
Outdoors we used pine cones as we found loads on our daily walk. I began by laying out two rows of six and asked how many pine cones were in 2 rows of 6? My eldest enjoyed counting them out and being able to see the answer. By using physical objects it made it a much easier concept to grasp. Once we’d explored a few 2 x tables, we then ventured into other times-tables simply to see how the arrays changed. Eventually I introduced the number cards (from last week) to show how it might be displayed in school and also to reiterate that these rows of pine cones do indeed represent mathematical concepts. I would lay out part of the question and asked him to find the missing number ( eg “This array shows 7 x …?”). Finally, we moved the numbers cards from one edge to the other to show that 4×2 is equal to 2×4.


Activity 6
Sequence & Pattern
Indoors
You could use:
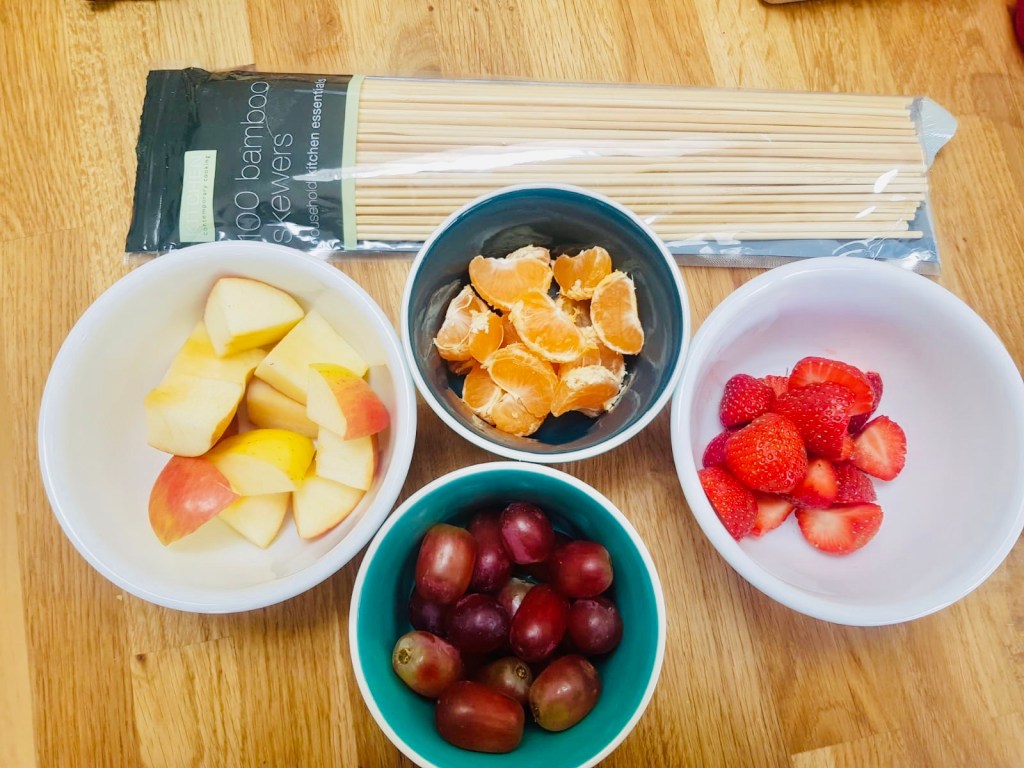
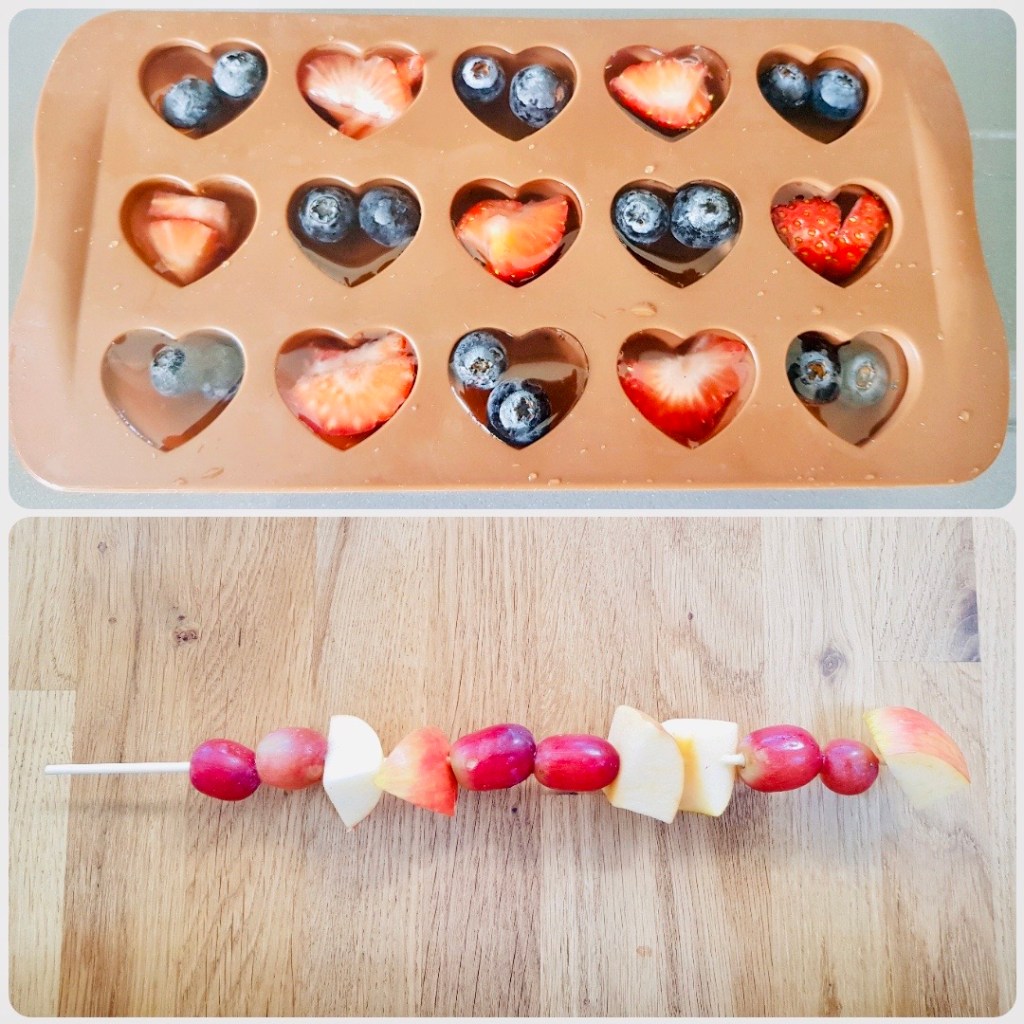
- Various Chopped Fruit
- Wooden Kebab Sticks
- An ice tray
- Various objects around the house (we used threading beads and cars)
Outdoors
You could use:
- Different textures & shapes & colours

Sequence and Patterns is another key mathematical concept to grasp – and it’s very easy to grasp when using objects and toys. Right now is the perfect time to explore this to give your child the confidence to recognise (and repeat) sequences and patterns through play.
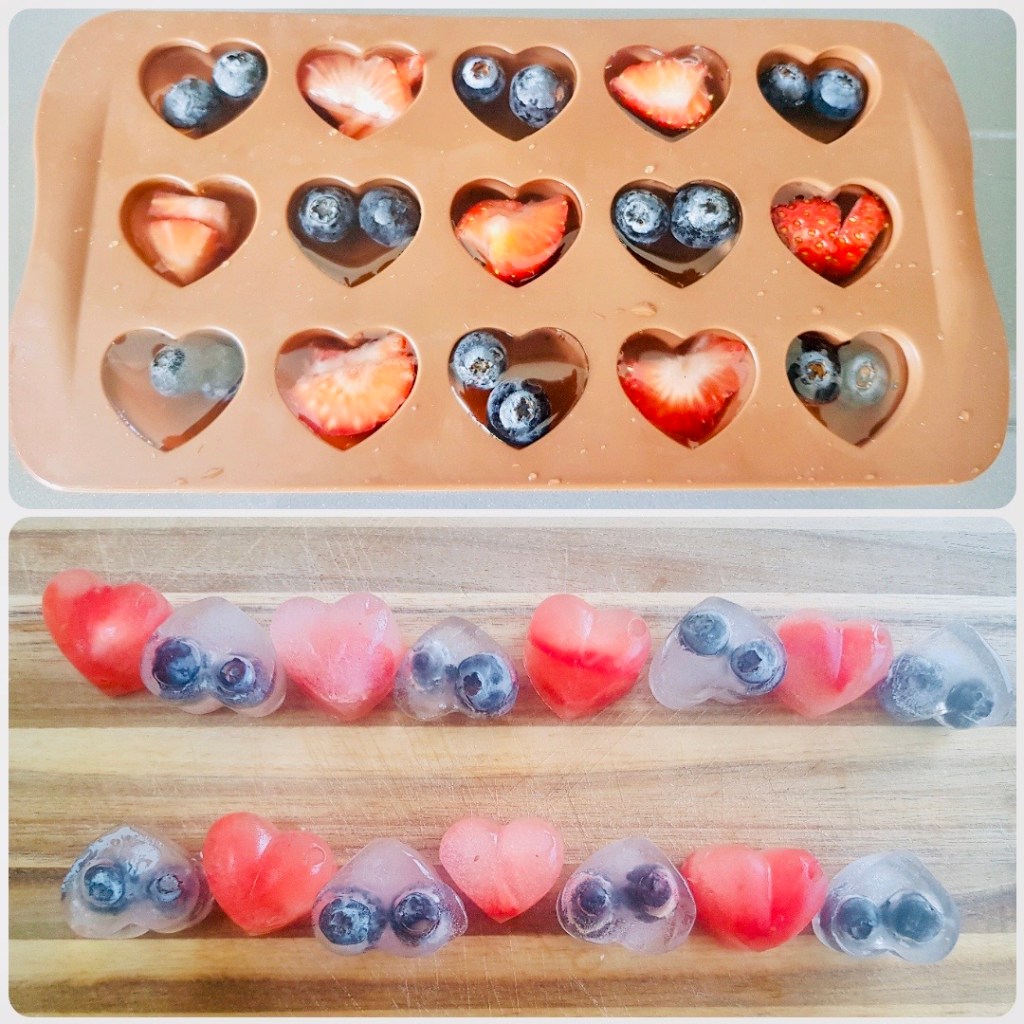
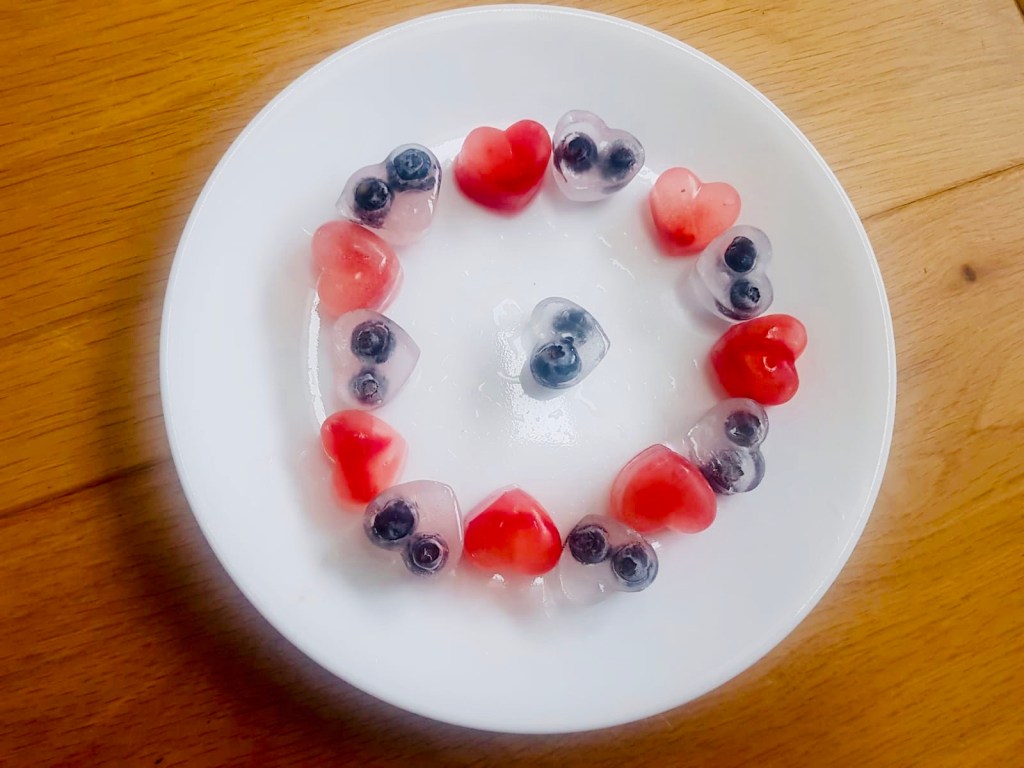
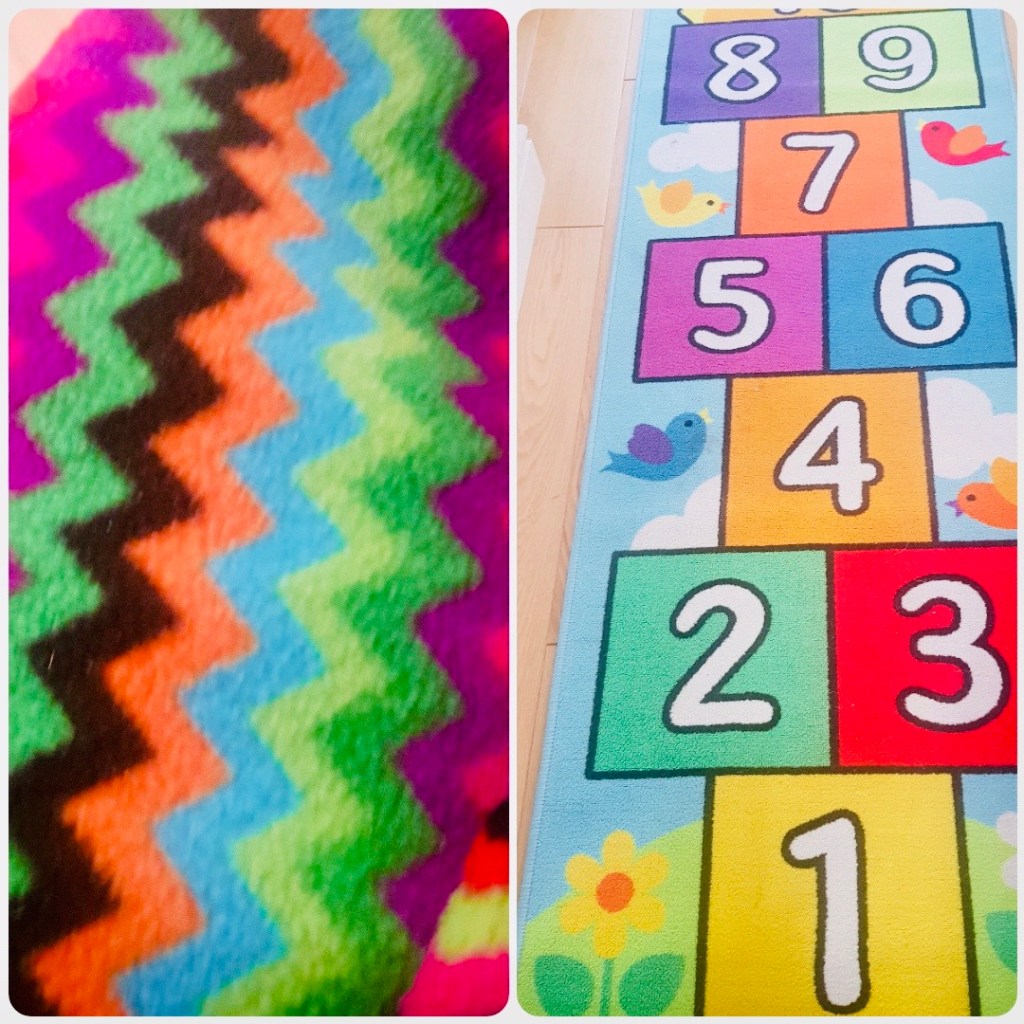
Indoors We started off by discussing that our challenge for the day was going to be trying to spot and make patterns around the house. We made fruit Kebabs. Aidan stuck to a pattern, Anya started one then went freeform with hers. She decided she wanted to make fruit ice cubes instead so she chose to repeat a blueberry/strawberry pattern. We noticed our hopscotch rug had a pattern in the layout of squares and our blanket had a nice zigzag pattern. We went on to spot lots more later too. With our threading beads and cars we made various patterns from simple to more complex. We noticed that you could make a continuous pattern by putting your objects in the shape of a circle. Our top tip for remember our patterns was to keep repeating them out loud to hear the pattern in our voice!


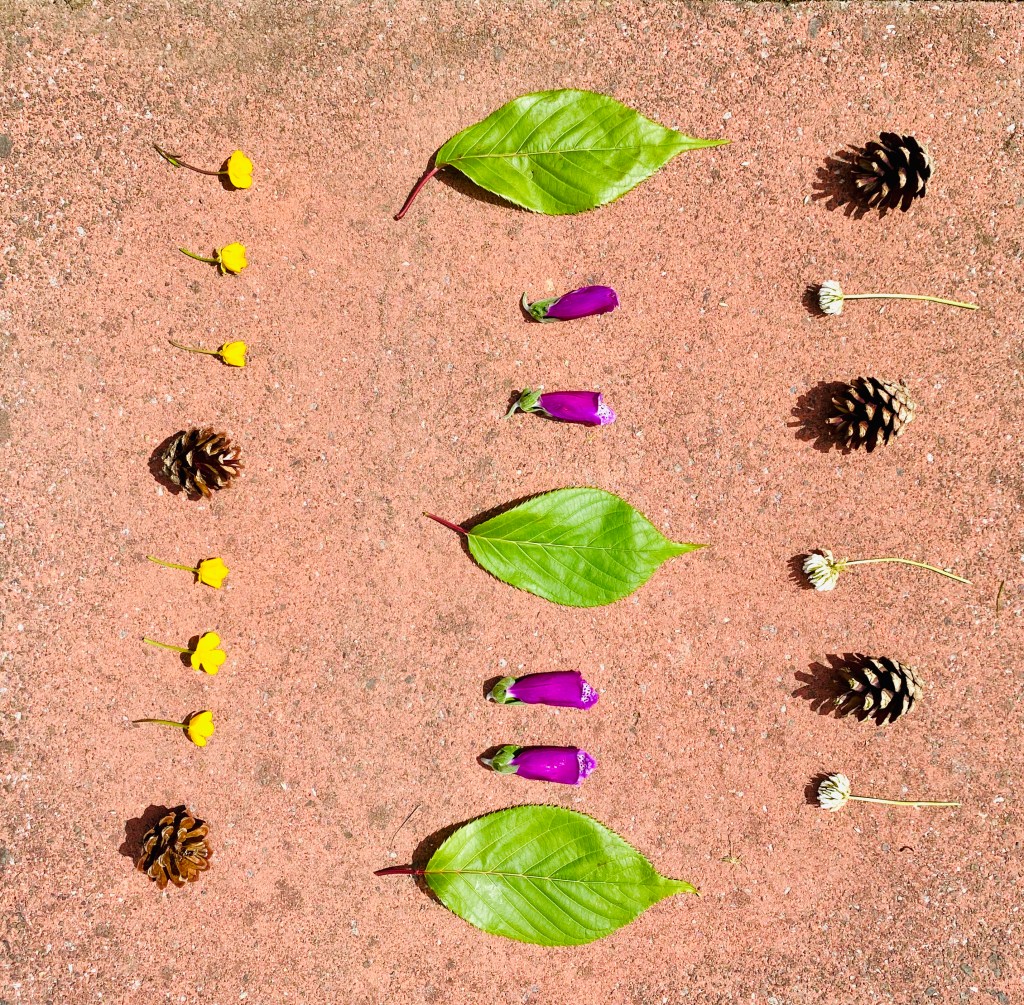
Outdoors we used a range of objects we’d collected on our daily walk and began making simple sequences. You could make these as long and as complex as you like. Remember to allow your child to test you and make sequences for you to complete!

Activity 7
Fractions
Indoors
You could use:
- Flour Tortillas
- Scissors
- Olive Oil
- Some fractions written down (optional)

Outdoors
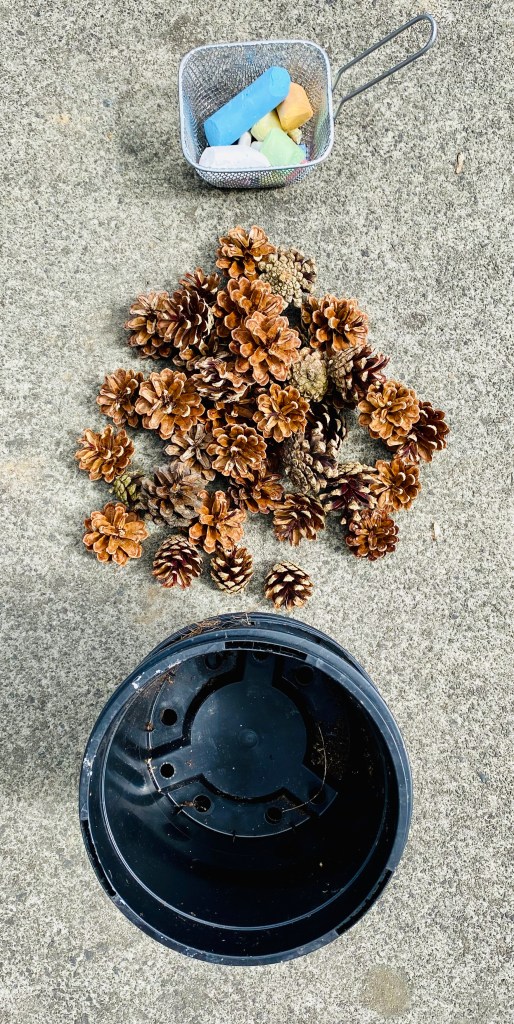
You could use:
- Pine cones
- Chalk
- Pots/containers
Fractions tend to send fear into people – however by simply using practical objects they are SUCH an easy concept to grasp! Remember that the most important part of fractions is that fractions are divided into EQUAL parts.
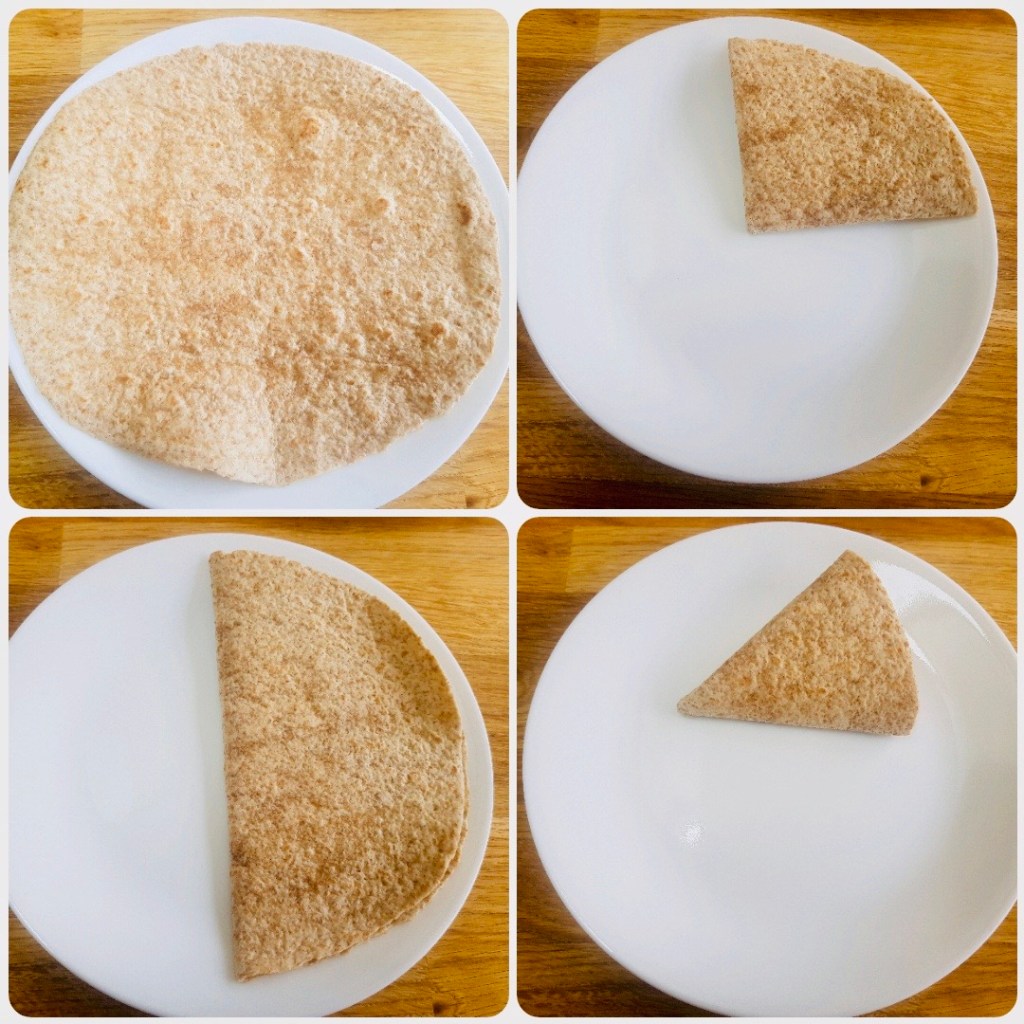
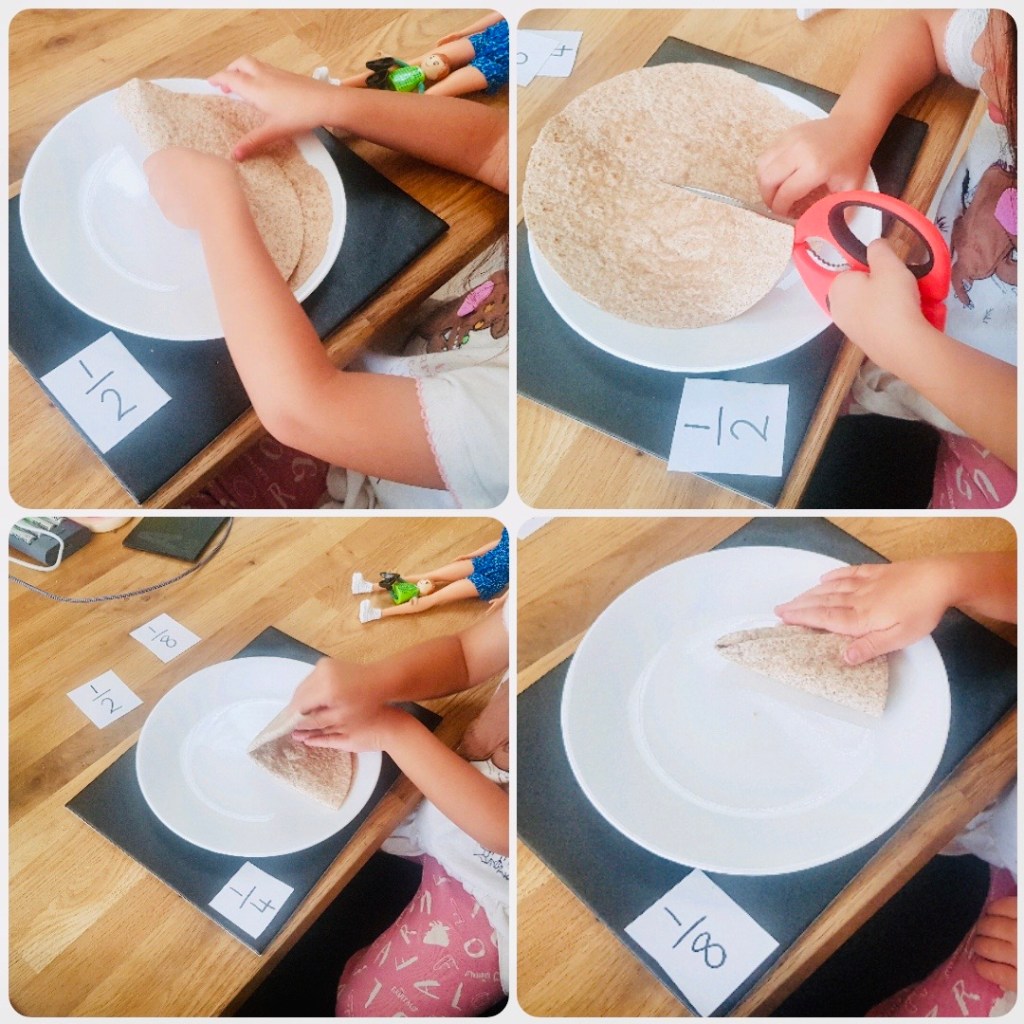
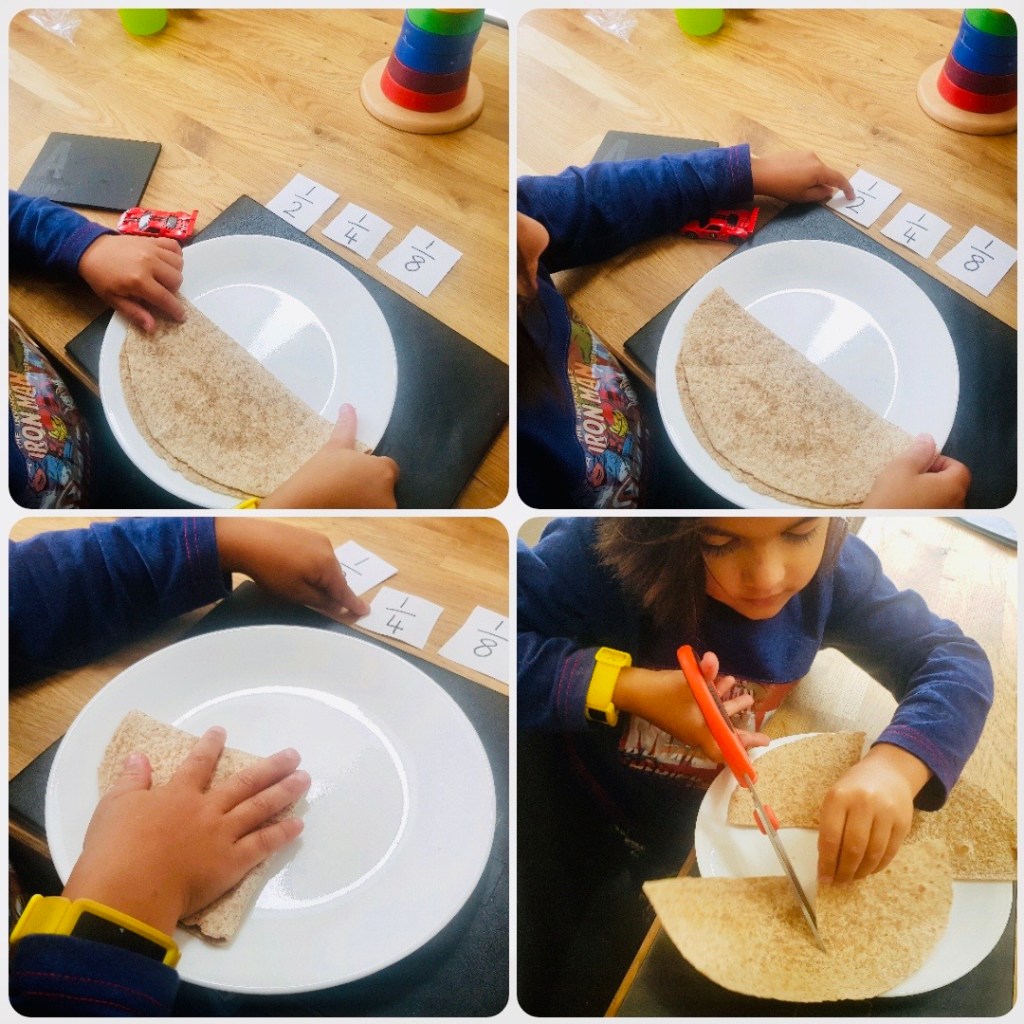
Indoors First we looked at our tortilla circle and discussed it as a “whole”. We then folded it and discussed “half”. We looked at how 1/2 is written down. We then repeated
this process by further folding into quarters and eighths. Next, we cut along the fold lines and made halves then quarters then eighths. We discussed how
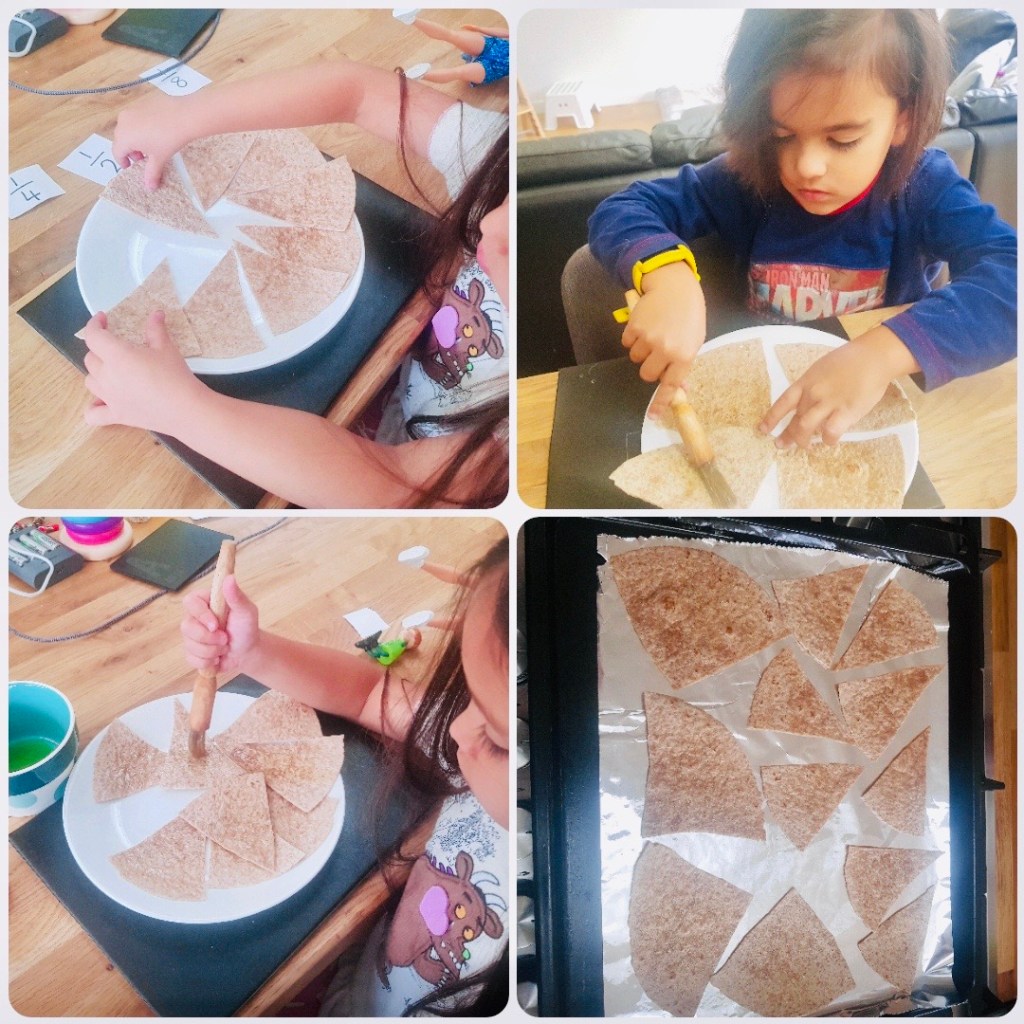
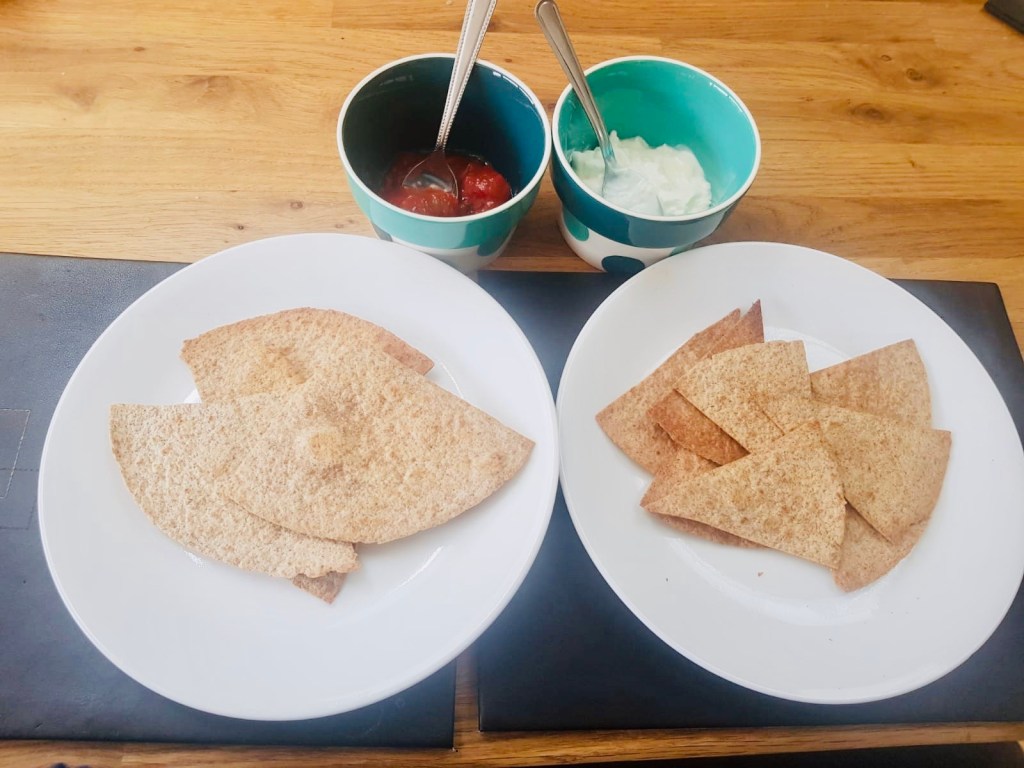
many of each fraction makes a whole. Then we brushed on some olive oil and popped our tortillas in the oven at 180deg for 10 minutes, turning half way. We shared them out and tried them with salsa and Greek yoghurt. Edible fractions are definitely a tasty way to learn! 🙂
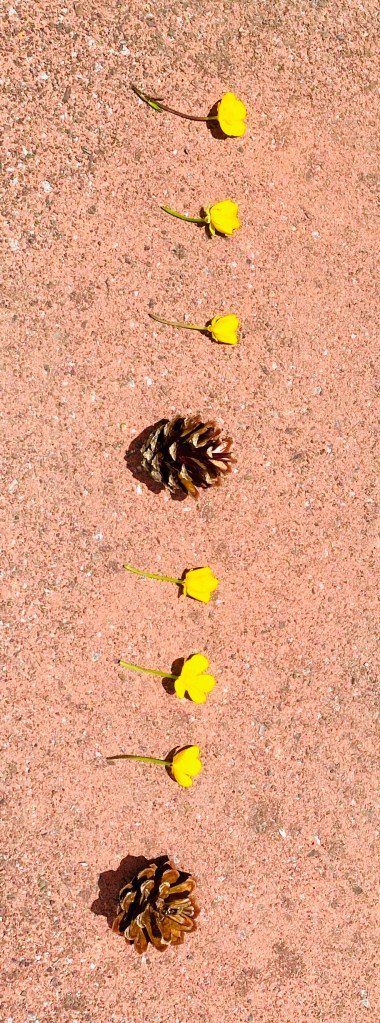
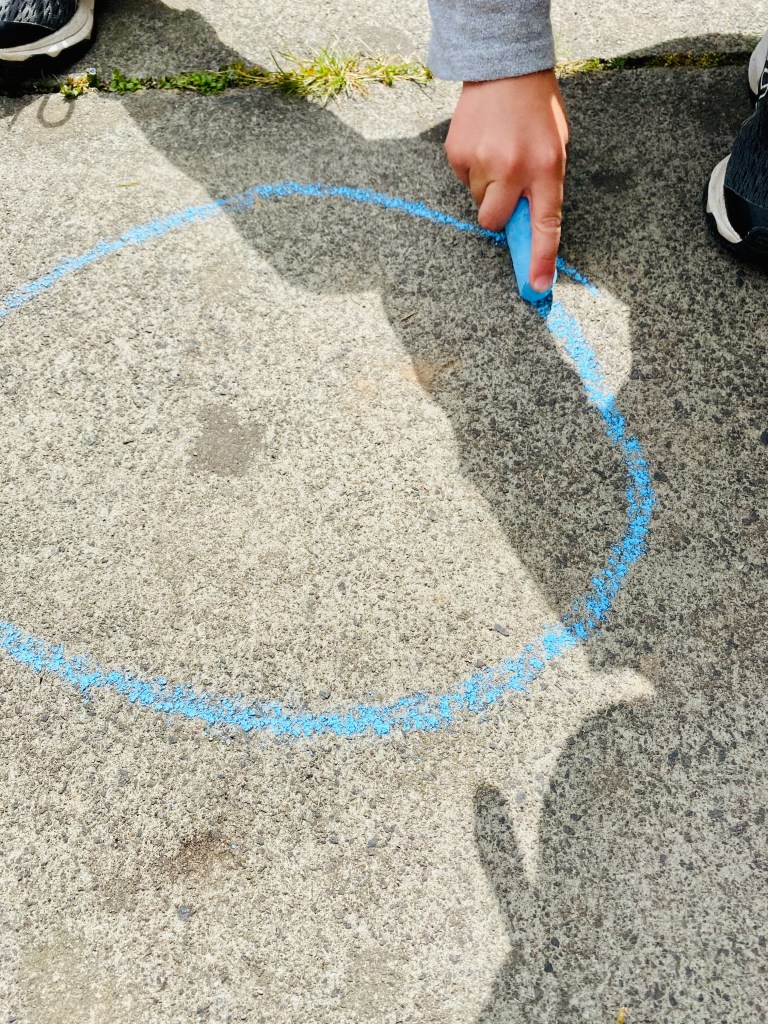
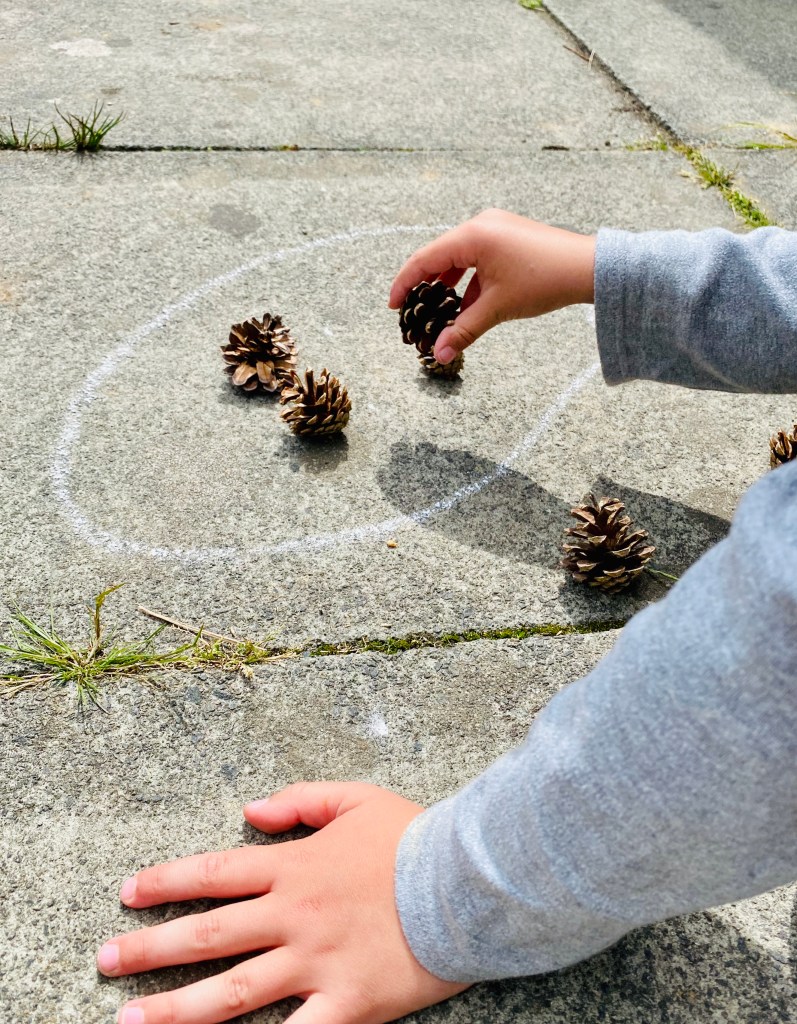
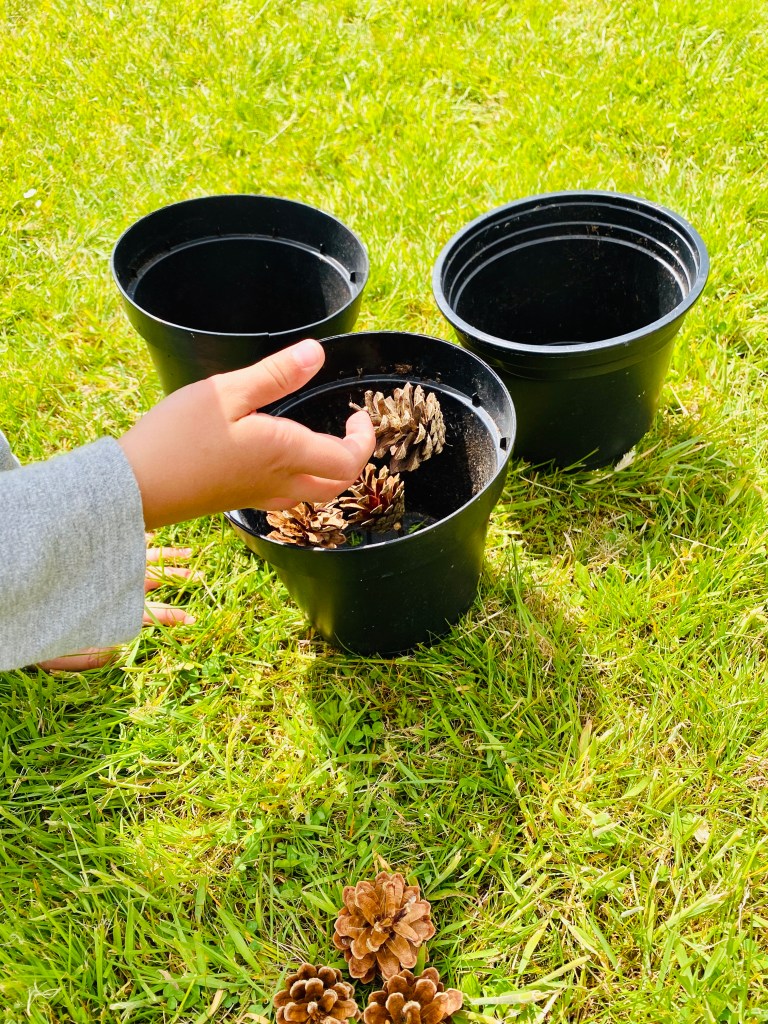
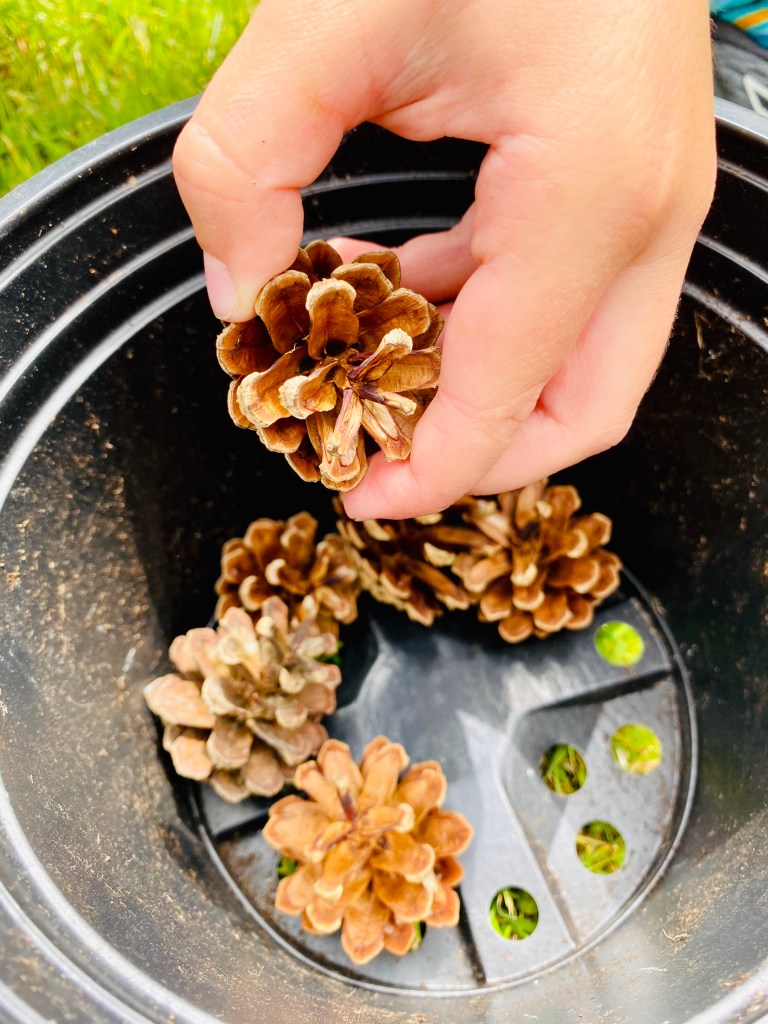
Outdoors we did this activity two ways – in one we drew chalk circles and practised sharing the vast amount of pine cones equally between each circle. After each share we practised counting to ensure that each circle had an equal amount. In the next part, we shared a set amount between plant pots – we began by splitting the cones equally between 3 pots (i.e. breaking it into 3rds). (I repeated that we were sharing 9 cones between 3 pots, thus 9 divided by 3 is 3 and we looked at how we worked this out and what that meant in physical terms – what’s important that children see and understand the physical process of sharing equally before they’re able to give specific answers). At one point my eldest (age 6) ended up with more in one pot than the others, however rather than telling him what to do I asked if all the pots had an equal number – and if not then was there one pot with more that could be shared so that all were equal.
In all STEM activities try to ask guiding questions that allow your child to work out the solution rather than simply telling them how to make it right. It’s much more satisfying for them, the learning lasts longer and makes them more resilient to try different strategies in the future (especially when they don’t have someone else to guide them).

We’ve absolutely loved doing these actitivies this week and hope that it shows how different the same outcome can look.
Don’t worry too much about the end result or what form your child’s play looks like – there is undoubtably learning happening. Sometimes (as with the activities above) learning can be structured and other times learning is more about social skills or language skills and that’s great too. So play with your kids and enjoy any learning that takes place.
Happy learning!xx
